


Genesys Salesforce Integration: A Complete Step-by-Step Guide
Table of Contents
Modern customer service teams need to move fast, stay connected, and deliver personalized support without relying on fragmented systems. That’s where Salesforce Genesys integration combines the capabilities of world’s leading CRM with a cloud-based contact center platform to create a seamless service experience. This integration allows businesses to centralize communication channels, streamline service workflows, and provide agents with real-time context, all within Salesforce.
Let’s explore how this strategic integration streamlines operations and enhances customer satisfaction, along with the best ways to initiate the integration process.
Key takeaways:
- An overview of Genesys Cloud CX and its core capabilities
- Why integrating Genesys with Salesforce matters for customer service teams
- A detailed look at how the integration works behind the scenes
- Steps-by-step integration, including prerequisites and best practices for a smooth setup
What is Genesys Cloud CX?
Genesys Cloud CX is a cloud-based platform that enables businesses to manage customer interactions across multiple channels, including voice, email, chat, SMS, and social media platforms like WhatsApp. Being powered by artificial intelligence, the cloud delivers personalized customer experiences, route customer interactions intelligently, and provides actionable insights based on real-time data.
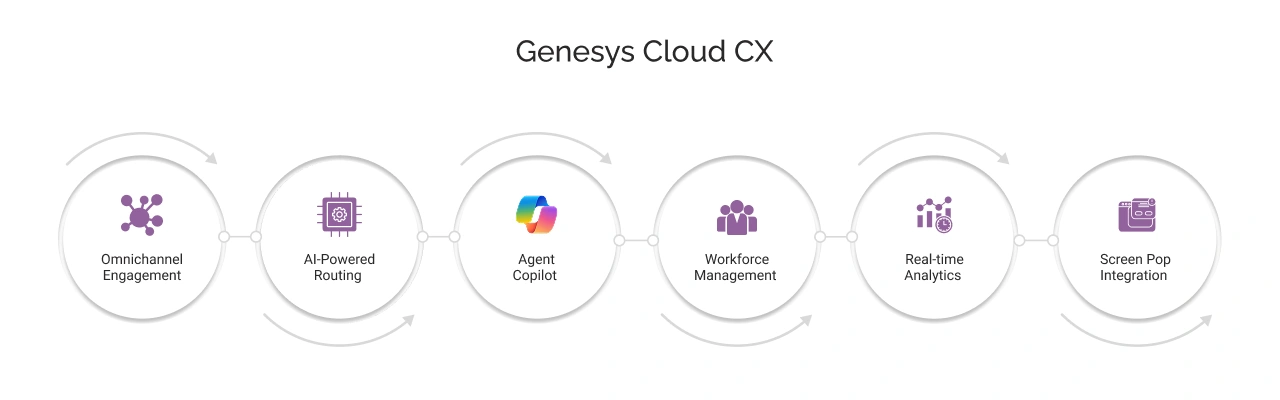
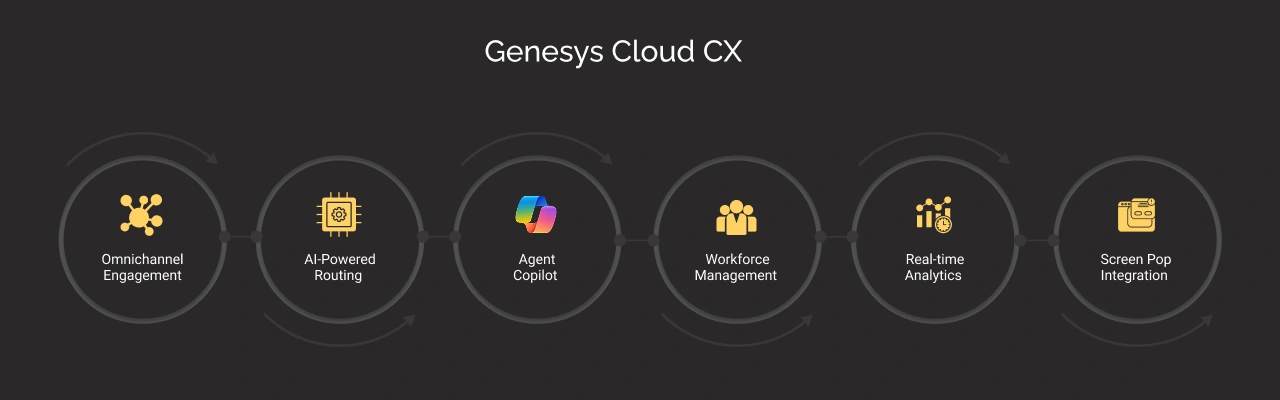
Some of its key features include:
- Omnichannel engagement: The platform supports seamless interactions across voice and digital channels. This ensures a consistent experience for customers. Additionally, the Messaging for In-App/Web (MIAW) feature allows users to connect and resume conversations with their customers persistently through web apps or mobile apps as and when required.
- AI-powered orchestration and Agent Copilot: It utilizes predictive AI for intelligent routing, chatbots, and personalized customer journeys. Moreover, it also assists agents in real time with knowledge suggestions for improved levels of conversations.
- Workforce Engagement Management (WEM): It aims to enhance agent/reps’ productivity by leveraging tools for scheduling, performance tracking, and coaching. Plus, the CRM and screen pop integration make sure to auto-surface relevant customer data during interactions, reducing call handling time and increasing personalization.
Understanding Salesforce Genesys Integration
This integration was designed to create a unified workspace where agents can manage customer interactions and access CRM data without switching applications. It leverages AI, bidirectional data sharing, and a common data schema to optimize customer and employee experiences.
Initially launched in 2023 with support for Salesforce Service Cloud, the integration marked a significant step toward streamlining customer engagement. Later in 2024 (Genesys and Salesforce Expand CX Cloud), the solution was available for Sales Cloud, Financial Services Cloud, and Health Cloud extending its value across more business functions.
The Importance of Integrating Salesforce with Genesys
The integration delivers measurable benefits. Let us take a closer look:
1. Unified customer experience:
The solution ensures a consistent and personalized service assistance to the customers. The reps and agents can deliver this because of the solution’s real-time data sharing and AI-driven contextually aware ratings. Example: A retail customer starts a chat about a delayed order, then calls. The agent sees the chat history in Salesforce, resolving the issue without repetition.
2. Improved Case Management:
It automates workflows like case creation and resolution, eventually leading to reduced average handle time (AHT). Since the solution merges CRM, CCaaS, and WEM, it supports agents to work in a unified Salesforce workspace with Genesys Cloud tools, eliminating the need for them to switch applications and improving case routing and resolution efficiency.
3. Enhanced team performance:
Real-time monitoring and coaching tools improve agent productivity and reduce attrition. Moreover, the pre-integrated data models and low-code tools minimize custom development and data wrangling, eventually reducing the burden on the IT teams and letting the teams focus on what’s more important, i.e., customer satisfaction.
4. Increased revenue:
The AI-driven insights from the solution help the agent identify cross-sell and upsell opportunities. This helps them boost sales and increase the sources of revenue.
How does Genesys Salesforce Integration work?
This is a simplified workflow explaining how this integration works:
- Customer Initiates Contact:
A customer reaches out and initiates the interaction via any supported channel, like voice call, web chat, email, SMS, or social media.
- Genesys Routes the Interaction:
Then the Genesys Cloud’s intelligent routing engine directs the interaction to the most appropriate agent based on availability, skills, or AI-driven criteria. The interactive voice response (IVR) or AI chatbots can handle routine queries or collect initial information.
- Agent Receives the Interaction in Salesforce:
Then the interaction appears within Salesforce’s user interface (typically the Service Console). The agent sees a screen pop with customer details, interaction history, and open cases, providing context for efficient assistance without having to switch platforms.
- Agent Responds via Embedded Genesys Interface:
The client-facing agents can then use Genesys Cloud tools embedded in Salesforce to manage the conversation. This can also include accepting or transferring calls, recording notes, and handling multiple channels simultaneously.
- Automatic Logging and Analytics:
Lastly, all interactions, notes, call recordings, and resolutions get logged in Salesforce automatically, eliminating the need for manual reporting. This information can be directly accessed by the concerned supervisors and they can further use it to asses or monitor the performance.
How Genesys Integrates with Different Salesforce Clouds
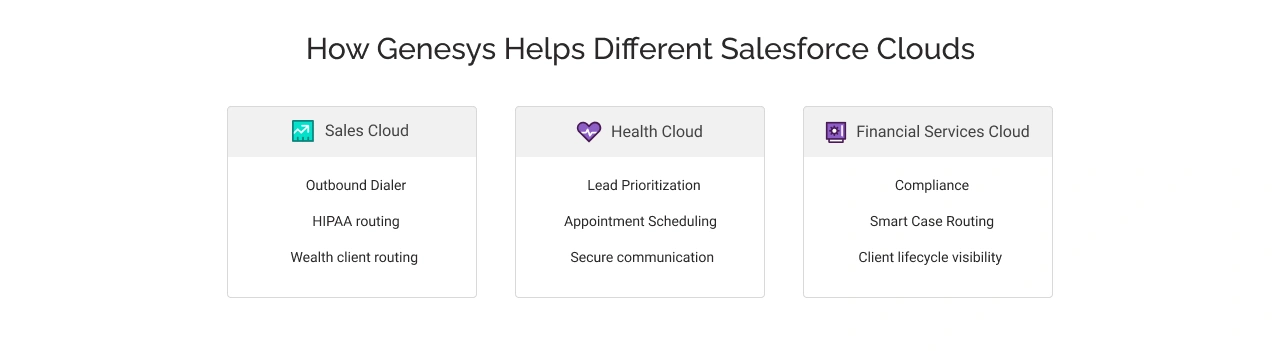
The integration offers tailored solutions for different Salesforce clouds:
1. Sales Cloud and Genesys Cloud CX
Sales reps can use Genesys Cloud’s outbound voice campaign features within Sales Cloud to contact leads effectively. Moreover, the automated lead prioritization powered by AI can help the reps focus on high-conversion leads, initiate calls directly from Sales Cloud, and ensure crucial compliance with regulations such as TCPA and PCI DSS.
2. Health Cloud and Genesys Cloud CX
With this offering, the care teams can effectively manage sensitive patient interactions securely, maintaining HIPAA compliance. Along with maintaining high standards of patient data confidentiality, enabling smart case routing for faster resolution and improved patient access for tasks like appointment scheduling, etc.
3. Financial Services Cloud and Genesys Cloud CX
The financial institutions can offer personalized service by unifying customer data and communication tools. This can result in improved collaboration between teams and high-value clients, eventually strengthening customer loyalty and overall institutional operations.
How to get started with Salesforce Genesys integration?
To help you implement the integration efficiently, we’ve outlined two primary approaches along with the necessary steps, prerequisites, and best practices
Pre-requisites:
1. System and account requirements:
- A Salesforce org (Sales or Service Cloud) running in Lightning Experience is required.
- You must have administrator privileges in Salesforce to install packages, configure settings, and manage user access.
- Additionally, ensure you have an active Genesys Cloud account with admin rights.
2. Network requirements:
For secure and uninterrupted communication between Genesys and Salesforce:
- Whitelist the IP address 177.104.46.240 on port 443. This enables AppxConnect to establish a connection.
- Use a modern, Chromium-based browser such as Google Chrome for optimal performance and compatibility with the embedded softphone and UI components.
3. App configuration requirements:
To enable accurate routing and efficient screen pops, the following setup is needed:
- Identify the Genesys Queue IDs or Campaign IDs that will be used to route interactions.
- Define your screen pop configuration, which determines how Salesforce records open when an interaction occurs:
- Choose the target Salesforce object (e.g., Contact, Account).
- Set up field mappings to match identifiers like phone numbers or emails.
- Optionally, define a fallback object (such as a Case) in case the primary match fails.
4. CTI integration settings:
CTI behavior controls how inbound interactions from Genesys are linked to Salesforce records:
- For calls, map the Genesys phone or campaign ID to a Salesforce field (e.g., MobilePhone).
- For chats, use a unique context field from Genesys to locate the matching Salesforce record. This is commonly based on the Email field.
- This ensures agents see the right customer or lead data instantly when they answer an interaction.
5. Activity logging and auto-update:
- Configure the system to log all calls and chats automatically, either to Salesforce Tasks or a custom object.
- Ensure key metadata such as call duration, agent notes, disposition, and conversation ID are captured and stored for future reference.
6. Capture Custom User Inputs (Optional):
If your workflow involves agents entering additional data during interactions:
- You can define custom fields (such as strings, checkboxes, or lookups) to capture inputs like issue categories, satisfaction ratings, or escalation flags.
- These inputs can be mapped to Salesforce fields and automatically saved, enabling better reporting and downstream automation.
Pro Tip: Preparing these prerequisites in advance not only speeds up the integration process but also ensures your team can leverage the full power of CTI, screen pops, and automation without delays or rework.
Before choosing a method, it’s worth understanding the foundational aspects of connecting Salesforce with external platforms. This Salesforce integration guide can help clarify what to expect in terms of architecture, APIs, and planning.
Integration Methods for Salesforce and Genesys
Method 1: Using Genesys Managed package (Recommended)
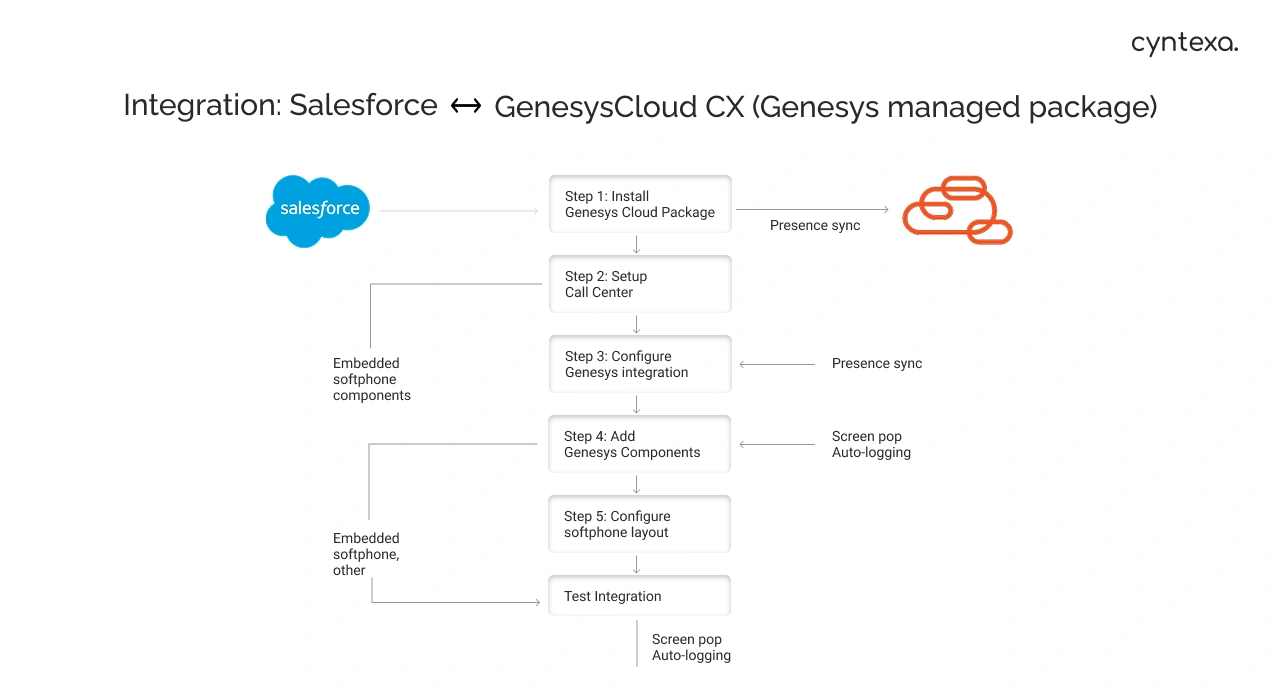
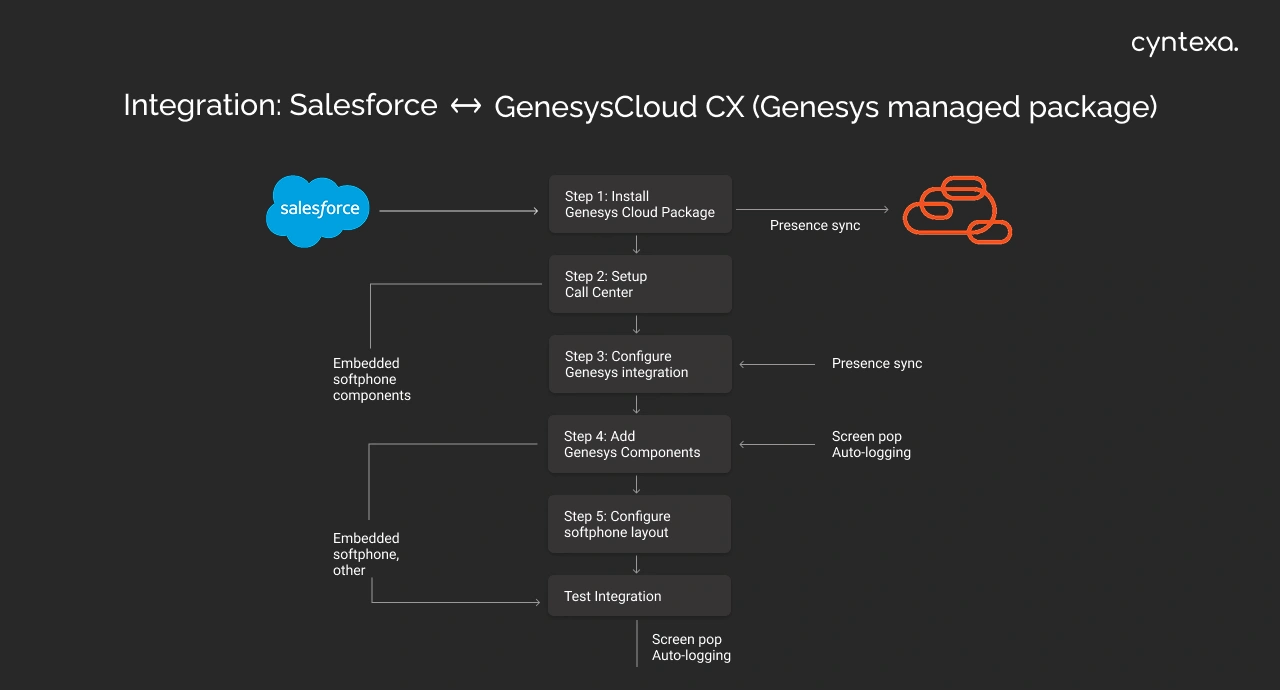
This approach provides a standardized, out-of-the-box integration supported by Genesys and suitable for most organizations that are using Salesforce Service or Sales Cloud.
Step 1: Install Genesys Cloud package
- Log in to Salesforce as an Admin
- Then go to Setup, find Installed Packages there,
- Click on Install a Package. Then select Genesys Cloud for Salesforce from AppExchange.
- Click Install for All Users, and make sure to follow prompts until installation is completed.
Step 2: Set up a call center
- In Salesforce Setup, search for Call Centers
- Once you find it, click on Import
- Then, upload the genesys.xml file provided by Genesys
- After the import is done, assign relevant users to the call center
Step 3: Configure Genesys integration
- Then log in to Genesys Admin Console
- Follow this: Integrations → Salesforce → Install
- Then, enter your Salesforce Org ID
- After that, set the required integration settings (like callback URLs, permissions, etc.)
Step 4: Enable omnichannel presence
- Meanwhile, in Salesforce org, navigate to Omni-Channel Settings
- Then enable Omni-Channel
- Create Presence Statuses (e.g., Available, Busy, Away)
- Then, in Genesys Admin, map these statuses to Genesys agent states
Step 5: Add Genesys Components to Lightning App
- Then, open App Manager in
Setup - Edit the Service Console App
- Go to the Utility Bar section
- Click Add Utility Item and add Genesys Softphone, Customer Journey View, or any other Genesys components you want.
Step 6: Configure Softphone layout
- In Setup, search for Softphone Layouts
- Then click on New
- Define:
- Screen pop settings (object to pop like Contact/Account)
- Field mappings (e.g., Phone → MobilePhone)
- UI preferences (layout size, tabs, pop behavior)
- Assign the layout to relevant users or profiles
Step 7: Test integration
- Log in to Salesforce as a configured agent user
- Simulate or receive an inbound call from Genesys
- Then check:
- If the screen pop appears correctly
- If presence sync works between Salesforce and Genesys
- If activity is logged (calls/chats) as expected
Method 2: Custom integration without managed package

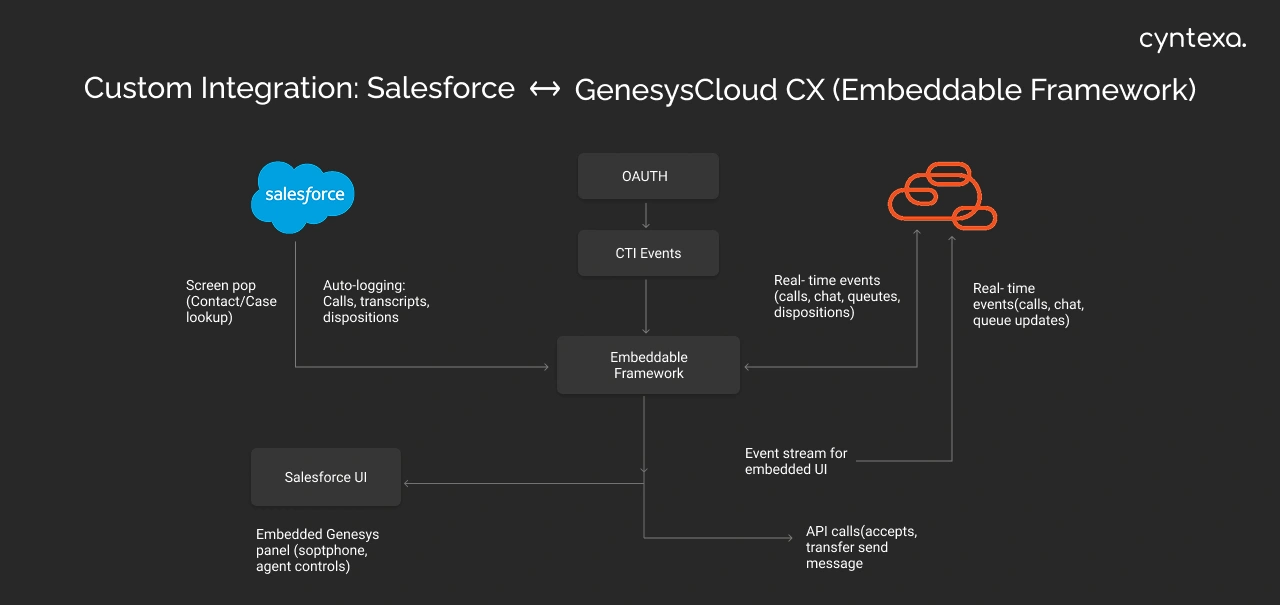
If you choose not to use the Genesys managed package for more flexibility or have technical requirements, you can still integrate Salesforce and Genesys via the Genesys Cloud Embeddable Framework or a custom CTI adapter.
Step 1: Create an OAuth client in Genesys Cloud
- Log in to Genesys Cloud Admin
- Go to: Admin → Integrations → OAuth
- Click Create Client
- Set Grant Type to Implicit Grant
- Add required redirect URIs and scopes (for Salesforce interaction)
Step 2: Host Genesys Cloud embedded framework
- Use the Genesys Embeddable Framework JS SDK
- Create a custom Visualforce Page or Lightning Web Component in Salesforce
- Embed the Genesys SDK into this component or page
Step 3: Embed in Salesforce console
- In Setup, go to App Manager
- Edit your Lightning Console App
- Add the Visualforce Page or LWC:
- As a Lightning Tab, or
- In the Utility Bar for persistent access
Step 4: Configure interaction settings
- Use the SDK’s config to:
- Define screen pop behavior
- Specify target Salesforce objects
- Map Genesys fields to Salesforce fields
Step 5: Test integration
- Log in to Salesforce Console as an agent user
- Load the embedded Genesys UI
- Receive or simulate an inbound interaction
- Eventually validate:
- Screen pop is triggered
- Agent presence is reflected
- CTI events are handled correctly
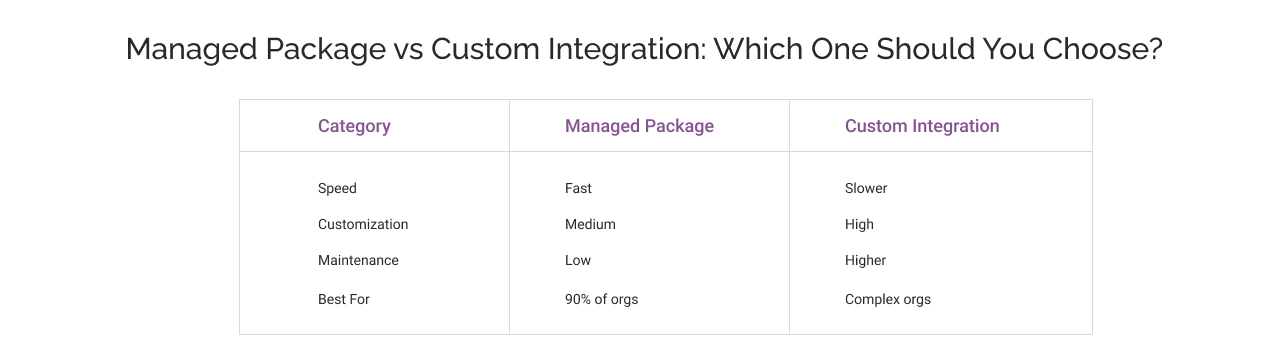
Thus, these were the steps for integrating Genesys Cloud with Salesforce without using the typical managed package method. Choosing the right approach depends on your specific requirements, and the comparison graphic below can help guide your decision.
For a solution that ensures seamless, scalable, and tailored integrations, explore our custom Salesforce integration solutions to see how we support seamless and scalable integrations tailored to your business specific needs.
Best Practices for Salesforce and Genesys Cloud Integration
- Always use a Sandbox or Developer Org for testing.
- Use Omni-Channel with clearly defined Presence Statuses.
- For custom integrations, validate security (CSP headers, OAuth tokens).
- Ensure Softphone Layout matches agent workflows.
- Monitor user adoption and call metrics from Genesys dashboard.
- Train support teams and document the integration setup.
Salesforce Genesys Integration Checklist
Based on the comprehensive steps mentioned above, we have created a wholesome integration checklist for you:
- Choose integration method (Managed Package or Custom)
- Select a suitable Salesforce partner for smooth integration
- Set up the Genesys and Salesforce connection
- Configured call center or embedded UI
- Added softphone and presence controls
- Tested with live user flows
- Document and train users

Final Take
Genesys and Salesforce integration can act as a transformative solution for businesses seeking to elevate their customer experience. By unifying the capabilities of both platforms, it addresses critical challenges and positions organizations for growth in a highly competitive market.
However, getting started with the integration can be overwhelming as multiple steps and configurations need to be taken care of. That’s where our team at Cyntexa comes in. As a trusted Salesforce integration company, we help you integrate Genesys Cloud and Salesforce seamlessly. With years of experience, our team ensures that your integration needs are met while keeping your business requirements in focus. Even after the integration is complete, we continue to support you by providing ample resources and 24/7 assistance.
So don’t hold back, tap into those missed opportunities, and get in touch with us today!
Don’t Worry, We Got You Covered!
Get The Expert curated eGuide straight to your inbox and get going with the Salesforce Excellence.
AUTHOR
Vishwajeet Srivastava
Salesforce Data Cloud, AI Products, ServiceNow, Product Engineering
Co-founder and CTO at Cyntexa also known as “VJ”. With 10+ years of experience and 22+ Salesforce certifications, he’s a seasoned expert in Salesforce Data Cloud & AI Products, Product Engineering, AWS, Google Cloud Platform, ServiceNow, and Managed Services. Known for blending strategic thinking with hands-on expertise, VJ is passionate about building scalable solutions that drive innovation, operational efficiency, and enterprise-wide transformation.


Cyntexa.
Join Our Newsletter. Get Your Daily Dose Of Search Know-How
