


Complete Guide to B2B Commerce Cloud Implementation
source on Google

Table of Contents
source on Google
B2B businesses today seek similar convenience and digital experiences as customers do while making bulk purchases. They demand continuous support, streamlined payment processing, and an easy-to-navigate experience with all product details displayed clearly.
However, there are certain hindrances that restrict B2B e-commerce sites or selling businesses from offering a seamless customer experience. These concerns with managing interactions with multiple vendors, branded stores, streamlining the operations of order processing, buyer-specific catalogs, and so on.
This is where Salesforce B2B Commerce Cloud comes into the picture offering versatile features and services for all your B2B business management needs. So, let’s begin your journey with the B2B Commerce Cloud. It will empower your e-commerce business, propel your profits, and position you as a leader in the ever-evolving world of commerce.
Allow us to let you unlock the secrets of the B2B Commerce Cloud and walk through how it can revolutionize your business strategy like never before!
Understanding B2B Commerce Cloud: An Overview
B2B Commerce Cloud is a cloud-based platform that streamlines all your B2B operations and offers a suite of applications for end-to-end support for sales, marketing, and commerce activities. it is one of the Salesforce commerce cloud product including B2C and D2C commerce cloud. It has everything you need to improve engagement, lead conversion, and bring in more business. From online storefronts, product information management, customer portals, order management, and inventory management to integration, everything is available for your ease.
In other words, this AI-powered B2B Commerce Cloud is a centralized hub where you can manage your business’s product catalog, order processing, and pricing structure. It streamlines the online shopping experience for B2B (business-to-business), ensuring exceptional customer experience and loyalty in the long run.
This solution comes with versatile features that benefit your business like no other. It empowers you with real-time analytics and reporting capabilities that help you gain deeper insights into sales performance and operations management. With this, you can make data-driven decisions, identify new marketing trends, and optimize your sales and marketing strategies.
It reduces the time to market your products and services by offering branded and user-friendly storefronts that showcase your offerings clearly to your customers. Moreover, it manages retention practices and strategies such as offering bulk discounts, providing additional services to customers, and so on. This is a win-win game for both the business, as they can sell more, and the customers, as they enjoy your services.
With B2B Commerce Cloud, B2B merchants can reap customer service improvement benefits through automated order renewals, personalized recommendations, order placement in a click, and much more for their clients.
To understand everything that Salesforce B2B Commerce Cloud can do, let’s gain a detailed understanding of its features.
Benefits of B2B Commerce Cloud Solutions
Salesforce’s B2B Commerce Cloud is a game-changer in this transformative digital landscape. It offers an array of benefits that you can leverage to boost your business’s operational efficiency and maximize your sales target.
Let’s take a closer look at some of the significant benefits of Salesforce’s B2B Commerce Cloud for your business:
1. Reduce time to market
In this technological shift, businesses are adopting new technologies to expand their brand. With traditional marketing, it’s challenging to market your product and aware the audience of your offerings, products, and services. That’s how Salesforce’s B2B Commerce Cloud comes into the picture.
Its user-friendly interface and involuntary tools allow businesses to launch and quickly scale their online storefronts, reducing the time to market the products and services. Additionally, this process enables B2B businesses to fulfill the growing market demands and always stay one step ahead of the competition.
2. Real-time analytics
A business’s job is not limited to only launching new products and services in the market. These services are of no use if not aligned with what customers expect. However, to address the customer’s challenges, you need to comprehend the opportunities for advancement and real-time insights.
B2B Commerce Cloud provides analytics and reporting capabilities, enabling businesses to monitor, track, and check performance progress. By leveraging the platform, you can gain real-time insights, sales performance, and overall business operations.
These analytics data help businesses to make data-driven decisions, identify new marketing trends, optimize sales and marketing strategies, improve customer experiences, and boost sales.
3. Cost savings
Every business thinks about cost-cutting every possible way from the process. B2B Commerce Cloud offers exceptional functionalities of self-service portals, order management, and inventory tracking, which increase operational efficiency reducing overhead costs.
Additionally, the platform scalability allows businesses to accommodate their resources to meet dynamic demand and maximize efficiency. By leveraging the platform, a business can streamline its operations, automate manual processes, and reduce overhead costs.
4. Discounts/offers
Customer retention is challenging for businesses in this competitive era, and the only way to run a long-term journey with customers is to deliver an exceptional experience and support.
How will you do this?
Providing discounts and bulk offers is another way businesses can aid from Salesforce’s B2B Commerce Cloud. The platform enables businesses to create and manage bulk discounts, facilitating customers to buy products and services for long-term success.
This is a win-win game for both the business and the customers. Businesses can easily sell more services, and customers can enjoy your services.
Key Features and Functionality of B2B Commerce Cloud
Here are some of the key features that this cloud offers, which makes it a versatile offering for businesses who are looking to establish their business online.
1. Catalog Management
Salesforce’s Commerce Cloud allows businesses to write clear and descriptive product catalogs with illustrative pictures on their e-commerce website. With this improved user interface, you can accumulate customers’ attention and enhance customer engagement rates.
Leveraging Salesforce’s B2B Commerce Cloud allows wholesalers to integrate product catalogs with the client contract. It helps them to tap a complete view of customer details in a unified view in the Salesforce platform.
With a well-structured and meticulous product catalog, B2B businesses can maximize conversion rates. However, customers get a clear product understanding to make informed decisions in no time.
2. Order Management
Every business wants seamless order management, and purchasing an OMS (Order Management System) license separately from Salesforce B2B Commerce Cloud plans is easy. As, you get an additional system with enhanced capabilities in nominal pricing.
Salesforce’s B2B Commerce Cloud is the right way to manage your orders. It offers reliable tools and processes to ensure timely product and service deliverables. From successful order creation, processing, tracking, managing inventory, and invoices to handling returns and refunds, everything you have with B2B Commerce Cloud.
With the endless benefits of Salesforce’s Commerce Cloud, a business can benefit from seamless integrations for streamlining other complex tasks, including payment gateways, inventory management, and shipping carriers.
You can also simplify the complete order management process by automating the return labels.
3. Optimized Inventory Management
In the e-commerce industry, inventory management is essential in streamlining the business flow and catering businesses to cater to customers with an impeccable omnichannel shopping experience without delays.
By purchasing a suitable order inventory management plan along with Salesforce’s B2B Commerce Cloud platform, vendors can access a consolidated overview of their inventory information, encompassing their online and offline stores. It permits them to experience a seamless order fulfillment process.
Also, the B2B Commerce Cloud ensures easy tracking and order placement for inventory stock based on customers’ purchase history, stock availability, sales generated, and product shelf life.
4. Customer Self-Service
Customer self-service empowers businesses with an efficient online experience. Salesforce’s Commerce Cloud allows customers to access and manage their accounts centrally.
Also, they can view order history, track shipments, and initiate returns effortlessly. This will eliminate the need for manual assistance, enhance the customer experience, and free up resources for more complicated customer inquiries.
Additionally, customers are flexible in quickly identifying answers to common questions with the self-service options. This improves customer service efficiency and enables a greater level of autonomy.
5. Personalization And Customization
According to a study by Gitnux, 83% of B2B buyers consider personalization the primary reason for their purchasing experience. This clearly shows how paramount personalization is in B2B businesses.
Salesforce’s B2B Commerce Cloud empowers businesses to deliver tailored shopping experiences and enhance customer engagement. With features like AI-driven recommendations, dynamic pricing based on customer segments, and personalized content, businesses can deliver tailored experiences to individual buyers.
By leveraging customer purchase history, the B2B Commerce Cloud empowers businesses to create personalized customer journeys that resonate with buyer interest. This widens the scope for targeted market campaigns, cross-selling, and up-selling to enhance customer loyalty.
6. Commerce AI
Extending the AI advancements, Salesforce offers Agentforce Commerce Agents that integrate seamlessly in your workflows and help you achieve goals with efficiency.
It works for you differently, improving the shopper, buyer and merchant experience. You can build a personal shopper for your customers that learns and adapts to what the customer wants and further suggests similar products and services in natural language. Moreover, you can utilize Eintein product recommendations that use an intelligent algorithm to understand the customer’s preferences and suggest products that they might like.
With Agentforce Buyer, create customer-grade experiences through agents that help your B2B customers to easily find and reorder products in natural language. This can work across any communication channel of their preference. Also, using AI-powered data analytics capabilities, generate summaries of interactions and gain deeper insights into customer conversations.
Agentforce Merchant Agent is your additional partner that handles your overall site management, including smart promotions as to how and when they would be applied. It creates smart descriptions for your product and services using the details you provided. This helps in boosting your visibility over search engines, ensuring that your offerings are easy to find.
7. Digital Storefronts
You get pre-built feature-rich templates that are also customizable according to your business needs. You can customize the UI of your storefront to match to your business logo and theme. As discussed, you can create product descriptions that boost your product and service’s online visibility.
Further, it allows you to integrate a number of partner apps that extend the capabilities of your business by offering app-like experiences and making navigation and site user-friendly. It supports headless commerce, allowing independent modifications to the front end and the back end of the site that do not hamper their working.
Moreover, your developers get a variety of efficiency tools and communities where they can learn and deploy modifications in the storefront. They have all the guidance resources handy with them, including documentation, a knowledge base, toolkits, and more.
Also Read: The Future of Salesforce Composable Storefronts
8. Pricing And Quoting
Salesforce’s B2B Commerce Cloud allows businesses to easily manage complex pricing structures, including tiered pricing, volume discounts, and contract pricing.
Along with pricing, it empowers B2B businesses to let their sales teams generate accurate quotes quickly, incorporating real-time product availability and pricing information using SFCC.
Following this process, you can streamline the sales process, improve quoting accuracy, and ensure consistent pricing across channels, enhancing customer satisfaction and increasing sales efficiency.
9. B2B Payment Methods
B2B Commerce Cloud empowers businesses to utilize their preferred mode of payment—credit or debit cards, Paytm, Gpay, Phonepe, PayPal, Amazon Pay, and ACH transactions.
These transactions can also process large-scale amounts for handling substantial purchase volume efficiently.
With Salesforce B2B Commerce Cloud, you can quickly integrate your merchant account to unlock the other payment modes tailored to your requirements.
10. Integrated CRM
Integrated CRM strengthens customer relationships and helps to win trust, enabling a 10x rise in sales and brand affinity.
The B2B Commerce Cloud comes with an integration ecosystem, enabling businesses to connect applications to automate mundane tasks and speed up operational processes.
To route qualified demand into Salesforce automatically, consider integrating B2B intent data tools that identify in‑market B2B accounts and feed behavioral signals to CRM that are enabling smarter segmentation, timely outreach, and higher conversion across your B2B storefront.
With the Salesforce B2B Commerce Cloud’s integrated CRM, businesses can connect with their customers at a personal level without delaying the answer to their inquiries in no time.
The platform provides a sales cloud tool, i.e., CPQ (Configure, Price, and Quote), to empower salespeople to minimize their sales cycle and negotiate product pricing and discounts at their best level through virtual communication.
Some Interesting Facts About B2B Commerce Cloud
The B2B Commerce Cloud market has been experiencing significant growth in recent years, depending on the growth of the B2B global market size. This is projected to expand at a significant compound annual growth rate (CAGR) of 18.2% from 2024 to 2030, as indicated by a report from Grand View Research.
The pandemic is said to be the major reason for the accelerated growth of online commerce in the years 2020 to 2022. After that, online businesses have seen a boost and never stepped back. A study by Forrester Research reveals that US B2B eCommerce will reach $3 trillion by the year 2027.
E-commerce has become a crucial part of everyone’s life, be it B2C businesses or B2B businesses. As per the SuperOffice report, 86% of buyers are ready to pay more than what businesses ask for experiencing better customer satisfaction.
Mobile commerce is also gaining traction in the competitive edge. According to a study by Statista, mobile commerce sales are expected to account for more than $2 trillion.
Therefore, the growing needs of the e-commerce industry have led to the adoption of B2B Commerce Cloud platform, which is well-positioned, reliable, and a go-to choice for enterprises of all sizes. While the statistics are subject to change, we have still compiled these statistics from credible websites.
Businesses That Use B2B Commerce Cloud
The usage of this cloud is not limited to small businesses. Some reliable and well-known brands, such as Starbucks, Skechers, FleetPride, PerkinElmer, and Campus Management, have already embraced the potential of the B2B Commerce Cloud.
Salesforce’s B2B Commerce Cloud pricing
While making Salesforce B2B Commerce Cloud an apt choice for optimizing operational efficiency for your business, pricing is an inevitable part. However, it does not offer a fixed pricing plan; the cost depends on the revenue generated by your business.
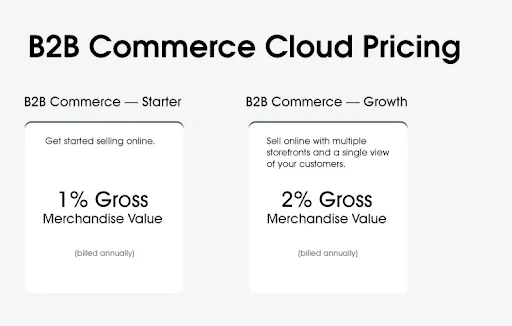
It offers 2 distinct plans: Commerce Cloud Growth and Commerce Cloud Advanced. Among these, you can choose the most prominent plan to scale your business growth by counting your business model, requirements, budget, and other exclusive resource costs.
Let’s explore its pricing in detail:

| Basis | Commerce Cloud Growth | Commerce Cloud Advanced |
|---|---|---|
| Pricing | With this plan, Salesforce charges 1% of the business’s revenue it made by selling its products and services through the platform. | In this plan, Salesforce charges 2% of the business’s revenue they made by selling their offerings through B2B Commerce Cloud. |
| Suitability | Offers you everything related to commerce and the integration of AI capabilities. Suitable for small and mid-sized businesses. | Specifically designed for large and mature companies, offering advanced feature capabilities. |
| Feature offerings | Allows you to build 6 distinct storefronts with pre-built yet customizable templates Offers limited functionality of order management Offers Salesforce Data Cloud credits up to 250K along with analytics, automation, and segmentation capabilities Allows 3 users each for CRM analytics and knowledge management Allows management of up to 10 inventory locations You get Einstein copilot for merchants and 60K credits | You can create 10 distinct, customizable storefronts. This plan allows you to leverage full order management capabilities It offers 500K credits for Data Cloud, allowing advanced analytics, segmentation, personalization, and automation capabilities It allows 5 users each for CRM analytics and knowledge management Allows management of up to 20 inventory locations You get Einetin copilot capabilities for merchants as well as shoppers and 120K credits |
Salesforce B2B Commerce Cloud Implementation Steps
Starting with this cloud’s implementation is not as easy as it seems. Therefore, it is advised that you go through Salesforce implementation guide to gain an idea of how the implementation process proceeds further.
Here is a detailed process of Salesforce B2B Commerce Cloud implementation process:
Step 1: Enable Experience Cloud Sites and Commerce Features
- 1.1. Enable Experience Cloud Sites
You must enable Digital Experiences and Role and User settings. - 1.2. Enable Commerce Features
It is important to Enable Commerce toggle, further enable the Refreshed Commerce App, and save - 1.3. Enable Order Preferences
In the Order settings, enable the following options:
- Enable Orders: Checked.
- Enable Negative Quantity: Checked.
- Enable Zero Quantity: Checked.
- Enable Enhanced Commerce Orders: Checked.
- Enable Optional Price Books for Orders: Checked.
- Enable Order Events: Checked.
Save your settings
- 1.4. Set Org Wide Defaults
Under Sharing Settings, edit the Default Internal Access (left) and Default External Access (right) as Public Read Only for Catalog, Electronic Media Group, and Order Delivery Method.
Step 2: Optimize Page Layouts
- 2.1. Update the Product Page Layout
In the Page Layout option, you can drag and drop the “product SKU” field to the product’s detail section.
Click on the related list and drag and drop the “Categories” and the “Commerce Entitlement Policies” down to the Related Lists section. - 2.2. Update Order Summary Page Layout
Following the previous steps, in the Page Layout option, you can drag and drop the “Start Reorder” action to the Salesforce Mobile and Lightning Experience Actions. - 2.3. Update Order Delivery Group Summary
Under Page Layout, in Order Delivery Group Summary Layout, you must click on the wrench icon related to the related list section and add Product Code, Product Name, and Product SKU fields to the list of displayed columns. Further, save your settings. - 2.4. Update Account Layout
In the Object Manager tab, go to Account Layout and drag “Enable as Buyer” and “Disable as Buyer” into the Salesforce Mobile and Lightning Experience Actions. Then, under Related Lists, ensure that “Carts,” “Contact Point Addresses,” “Contacts,” and “External Managed Accounts” are present, adding them if necessary. Finally, save your settings. - 2.5. Update Contact Layout
In the Object Manager Tab, go to Contact Layout and drag the “Enable Customer User, Log in to Experience as User,” and “Disable Customer User” actions to the Salesforce Mobile and Lightning Experience Actions, and save your settings.
Step 3. Set Up a B2B storefront with Commerce Setup Assistant
Here, you can set up a B2B storefront using the Commerce Setup Assistant.
Under Commerce Setup Assistant, get started with the setup by checking relevant terms and conditions. Perform additional setup by adding dashboards and reports, further click on Get Started and ensure that the update is complete.
Step 4. Finalize Commerce App Setup
- 4.1. Enable Data Translation and Multi-Currency (Optional)
In Company Information, you must check ‘Activate Multiple Currencies’ and ‘Enable Data Translation’ and save it. - 4.2. Field Accessibility and Commerce App Reports
From Field Accessibility, choose your sales store, enable the Visible option, and Add Sales Store in Order Layout. Further, save your changes.
To implement the changes, click on the Hidden label next to System Administrator and update it to Visible by selecting the Visible checkbox. Additionally, ensure the Sales Store field is added to the Order Layout page layout by checking the corresponding checkbox.
Step 5: Store Creation with B2B Template
Let’s create a B2B store using a template. Start by choosing the ‘B2B Store’ option, and select country, language, and currency. Further, add the store name and URL path.
Step 6: Load CMS data
You can load CMS data manually or via a CSV file, whichever method suits you prefer.
Step 7: Load Product data
You can load product data manually or through a CSV file. After loading the data, you have to go to the store’s search Index page, enable the automatic updates toggle, and click on Update.
Step 8: Modify Content Security Policy, Adjust Site Membership and Establish Roles
Go to the Commerce Storefront console, under Experience Builder, in the Security and Privacy tab, change the security level to Relaxed CSP. Permit Access to Inline Scripts and Allowed Hosts and click the Allow button if prompted.
Go back to Experience Builder, in the Administration option,Click on the Member tab and select profiles for System Administrator and Customer Community Plus User. Save your settings.
Navigate to Salesforce Setup. Verify that you have at least one role as a portal account owner.
Step 9: Create a Catalog and Categories
- 9.1. Verify Catalog Creation
Go to App Launcher, select Commerce and further in the Categories label, click on any product and ensure that the product description is populated. - 9.2. Create a Catalog (Optional)
You can create new catalogs as well by justifying names, categories and assigning products. Assign this catalog to the store. Further, click on save.
Step 10: Accounts, Contacts and Buyer Groups
- 10.1. Create an Account
Go to the Commerce app and create an account record by selecting the Business Account option, completing the form with relevant details, and saving it. Further, enable Buyer actions, Customer User buttons and setting permissions for a smoother account creation. At last, save your settings. - 10.2. Assign Buyer Account into the Buyer Groups
After the account is successfully created, assign buyers to the Buyers group.
Step 11: Commerce Entitlement Policies
Add products in the Entitlement policy from the Related tab in Buyers Group.
Step 12: Build Search Index
- 12.1. Add Fields to the Search Index
Allow users to search for specific fields right from the search box, eliminating the complex steps. Navigate to your B2B store home page in the commerce app, add fields in the Manage Searchable Fields, and click save. - 12.2. Add Results Filters
Allow users to search for specific products by applying filters for quick product visibility.
Add and manage filters in Product Family and save your settings.
Step 13: Configure Checkout
You can configure the checkout page as per your preferences.
- 13.1 Register Reference Implementation Classes
Open your store in the Commerce app, go to Checkout settings, and access the Shipping tab. In the Providers section, find General Shipping Profile and click Manage to add or edit rates for the U.S. Shipping Zone or set conditions. - 13.2. Apex Class
You can create Apex classes for shipping, payment, inventory check, pricing, and taxing by navigating through Workbench. Select queries from Workbench and complete the form with all the developer details confirming the success of query addition.
Step 14: Store Integration Service Mappings
- 14.1. Mapping Tax Service
Use the tax calculator extension of your choice and map it to your checkout page. - 14.2. Mapping Shipping Service
Map your shipping services by choosing a preferred shipping extension at the checkout page.
Step 15: Payment Gateways
- 15.1. Create a Named Credential
Create named credentials to ensure optimal security. - 15.2. Create Payment Gateway Provider via Workbench
Using Workbench, create a preferred payment gateway provider by filling in the necessary form details. - 15.3. Create Payment Gateway
Add a default and preferred payment gateway. - 15.4. Map Payment Integration to Storefront
Set up your payment integration provider.
Step 16: Create and Assign Contact Point Addresses.
Set up the default address by filling in the preferred contact point address and the alternate contact point address.
Step 17: Activate the Store
Navigate to the store home page in the Commerce Storefront Console App. From the Administration tile, click the Store Activation and then on the Active button.
Step 18: Add Product price
Choose the price book and preferred currency, then assign Pricebook to the Entitlement Policy. Further log in to the site and you are done setting up your B2B Commerce Cloud.

Is It Necessary To Involve Any Professionals In Salesforce B2b Commerce Cloud Development?
Yes! Development requires skilled knowledge, technical expertise, and a mindset to develop a solution that meets client requirements. That’s why the involvement of experienced Salesforce developers comes into the picture.
Here we have compiled a list of reasons why you should consider hiring an expert developer.
1. Diverse Expertise in B2B Commerce Cloud
Highly skilled B2B Commerce Cloud Salesforce developers can understand user requirements in-depth, meeting customer expectations. Since the Salesforce B2B Commerce Cloud developers are platform experts, they are familiar with the platform’s architecture, data models, APIs, and integration options. They can leverage the platform to its full potential and contribute to the high-quality, robust, and scalable solutions that users require.
2. Effective Development
Since professionals understand all the tidbits and pitfalls of the platform, they can efficiently leverage it to the fullest. This familiarity helps them leverage platform features and core functionality to create a scalable, robust, and tailored e-commerce solution that meets customers’ unique requirements.
3. Customization and Integration
Salesforce B2B Commerce Cloud often requires integration with third-party applications, including payment gateways, inventory management, and CRM systems. Businesses can easily ensure strategic planning and product management by following these essential integrations, i.e., ERP (Enterprise Resource Planning) and PIM (Product Information Management).
Professional developers can seamlessly integrate with third-party software and systems, ensuring synchronized data flow and user experience. They are experts in supervising data mapping, conversion, and workflow automation, assuring seamless streamlining of B2B operations. Additionally, hand on experience in frontend and backend components customization to align with your branding and business workflows.
4. Future Scalability, Security, and Maintenance
The B2B Commerce deals with sensitive information (business and customer data), requiring a high-end security measure. Since the professionals are well-versed with the industry’s best practices and can ensure robust security measures, such as data encryption, user authentication, and role-based access controls GDPR (General Data Protection Regulation )
Additionally, they can ensure timely upgrades, security patches, bug fixes, and necessary enhancements as the business evolves. This keeps your site up-to-date, secure, and optimized performance for the long run.
5. Complex B2B Functionality
Since the B2B Commerce Cloud is convoluted and requires a professional to handle the platform challenges. These challenges include pricing models, multiple catalogs, custom workflows, account hierarchies, contract management, and advanced order management. Professionals can address and navigate these complexities and ensure tailor-made solutions for seamless user experience.
6. Training and Support
Salesforce Commerce Cloud development involves various processes. Hence individuals’ contribution may be a challenging task. To address this challenge, professionals can provide proper platform understanding to their core team members and supporters. This will allow him to reduce workload, improve efficiency, and assign roles to different team members. Additionally, B2B Commerce Cloud professionals can provide ongoing assistance, ensuring quick solutions to your challenges and seamless platform operation.
7. Setup Feedback Forms
Selling products and services can help you maximize revenue. But only receiving constructive and valuable customer feedback can set a benchmark for better user experience or customer satisfaction. Professionals can set up a feedback form and links where customers can give suggestions to improve the services on placing an order. This helps in better decision-making and improving customer purchasing experience.


Embrace the future of B2B Commerce Cloud—Are you prepared?
Salesforce B2b Commerce Cloud implementation can potentially revolutionize your B2B business. By diligently following our comprehensive guide and promptly taking the necessary steps, you can unlock the immense capabilities of this platform.
By leveraging the platform’s core functionalities, you can create a scalable, customized, and flawless online store to deliver an exceptional customer experience and maximize growth revenue for your business.
Don’t let the initial hindrances of implementing Salesforce B2B Commerce Cloud be huge walls that hold you back from unleashing its full capacity.
Have you decided, or do you still have reservations about your decision?
By leveraging suitable resources and receiving continuous support from a Salesforce Development Partner, you can effectively tackle your business challenges, navigate complex processes, achieve key performance indicators (KPIs), and gain a competitive edge over others in the market.
Also Read: Top 15 B2B E-commerce Trends
Why Cyntexa?
We offer Salesforce Commerce cloud consulting services to deliver the best possible solution for your unique business requirements to bring tangible impact on your customers.
Our 400+ Salesforce experts are proficient in offering a suite of implementation services that can help you optimize your customer experience, streamline your sales process, and ensure seamless customer interaction.
So what’s stopping you from taking action? Let us convert your dream of an e-commerce site into reality!
Don’t Worry, We Got You Covered!
Get The Expert curated eGuide straight to your inbox and get going with the Salesforce Excellence.
AUTHOR
Priyanshu
Salesforce Commerce Cloud Expert
Priyanshu, a Commerce Cloud expert, has 6+ years of experience and 8+ certifications. He specializes in crafting seamless, scalable e-commerce solutions that enhance customer experiences, maximize conversions in the digital marketplace. His expertise ensures businesses stay agile, competitive, and customer-centric.


Cyntexa.
Join Our Newsletter. Get Your Daily Dose Of Search Know-How
Frequently Asked Questions
Salesforce B2B Commerce Cloud allows businesses to build storefronts for their e-commerce store, dealing with a large volume of purchases. B2B commerce customers require an easy communication pathway to suppliers to buy products quickly.
Salesforce Commerce Cloud is the base for B2B commerce cloud, enabling you to integrate and synchronize CRM data with commerce data.
B2B (Business-to-Business) is a business-oriented e-commerce that leverages online platforms for branding or marketing its products and services. In contrast, B2C (Business-to-Customer) is a customer-centric platform focused on individual customers to market their products and services.
