


Salesforce SharePoint Integration: A Step-by-Step Guide to Seamless Connectivity
source on Google

Table of Contents
source on Google
Salesforce is the world’s leading CRM, while SharePoint powers enterprise document management. But when these systems operate in isolation, they create unnecessary friction, including version control issues, scattered data and limited storage within Salesforce.
SharePoint’s storage and enterprise-grade version control features are ideal where Salesforce falls short, providing a streamlined way to manage documents with the utmost security. By integrating both platforms natively, you can eliminate all these compromises.
So, how does Salesforce SharePoint integration work, and and what’s the best way to connect SharePoint with Salesforce?
This blog covers a why you should integrate along with a step-by-step guide to integrating Salesforce and SharePoint, a native method without any dependency on third-party tools or a connectors..
Overview of SharePoint

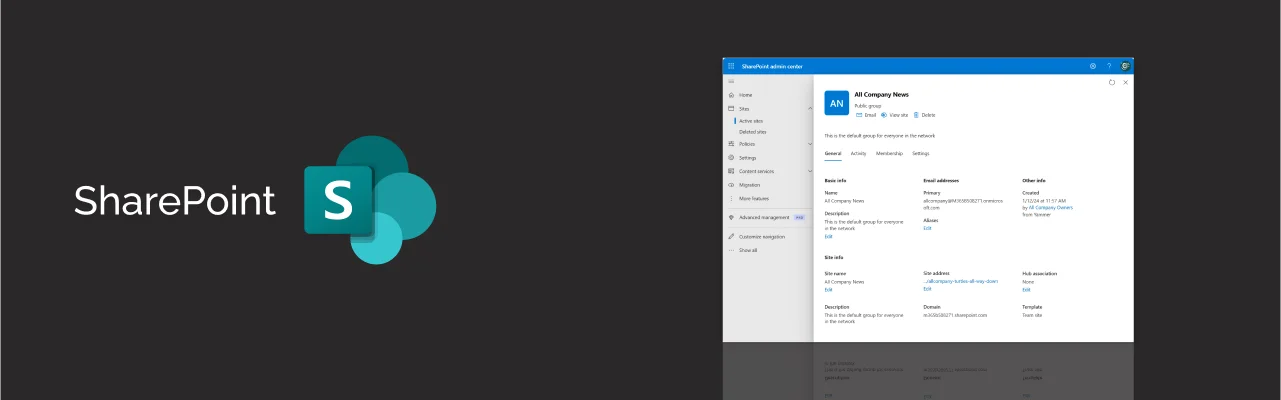
SharePoint is a Microsoft product that allows businesses to facilitate team collaboration and streamline document management. It enables users to create sites, securely store & share information, manage content with workflows, view document history & restore older versions, etc.
SharePoint is easily accessible from devices such as PCs, smartphones, tablets, etc. Users only need a stable internet connection and a web browser. It facilitates team communication by engagingly showcasing visuals and updates.
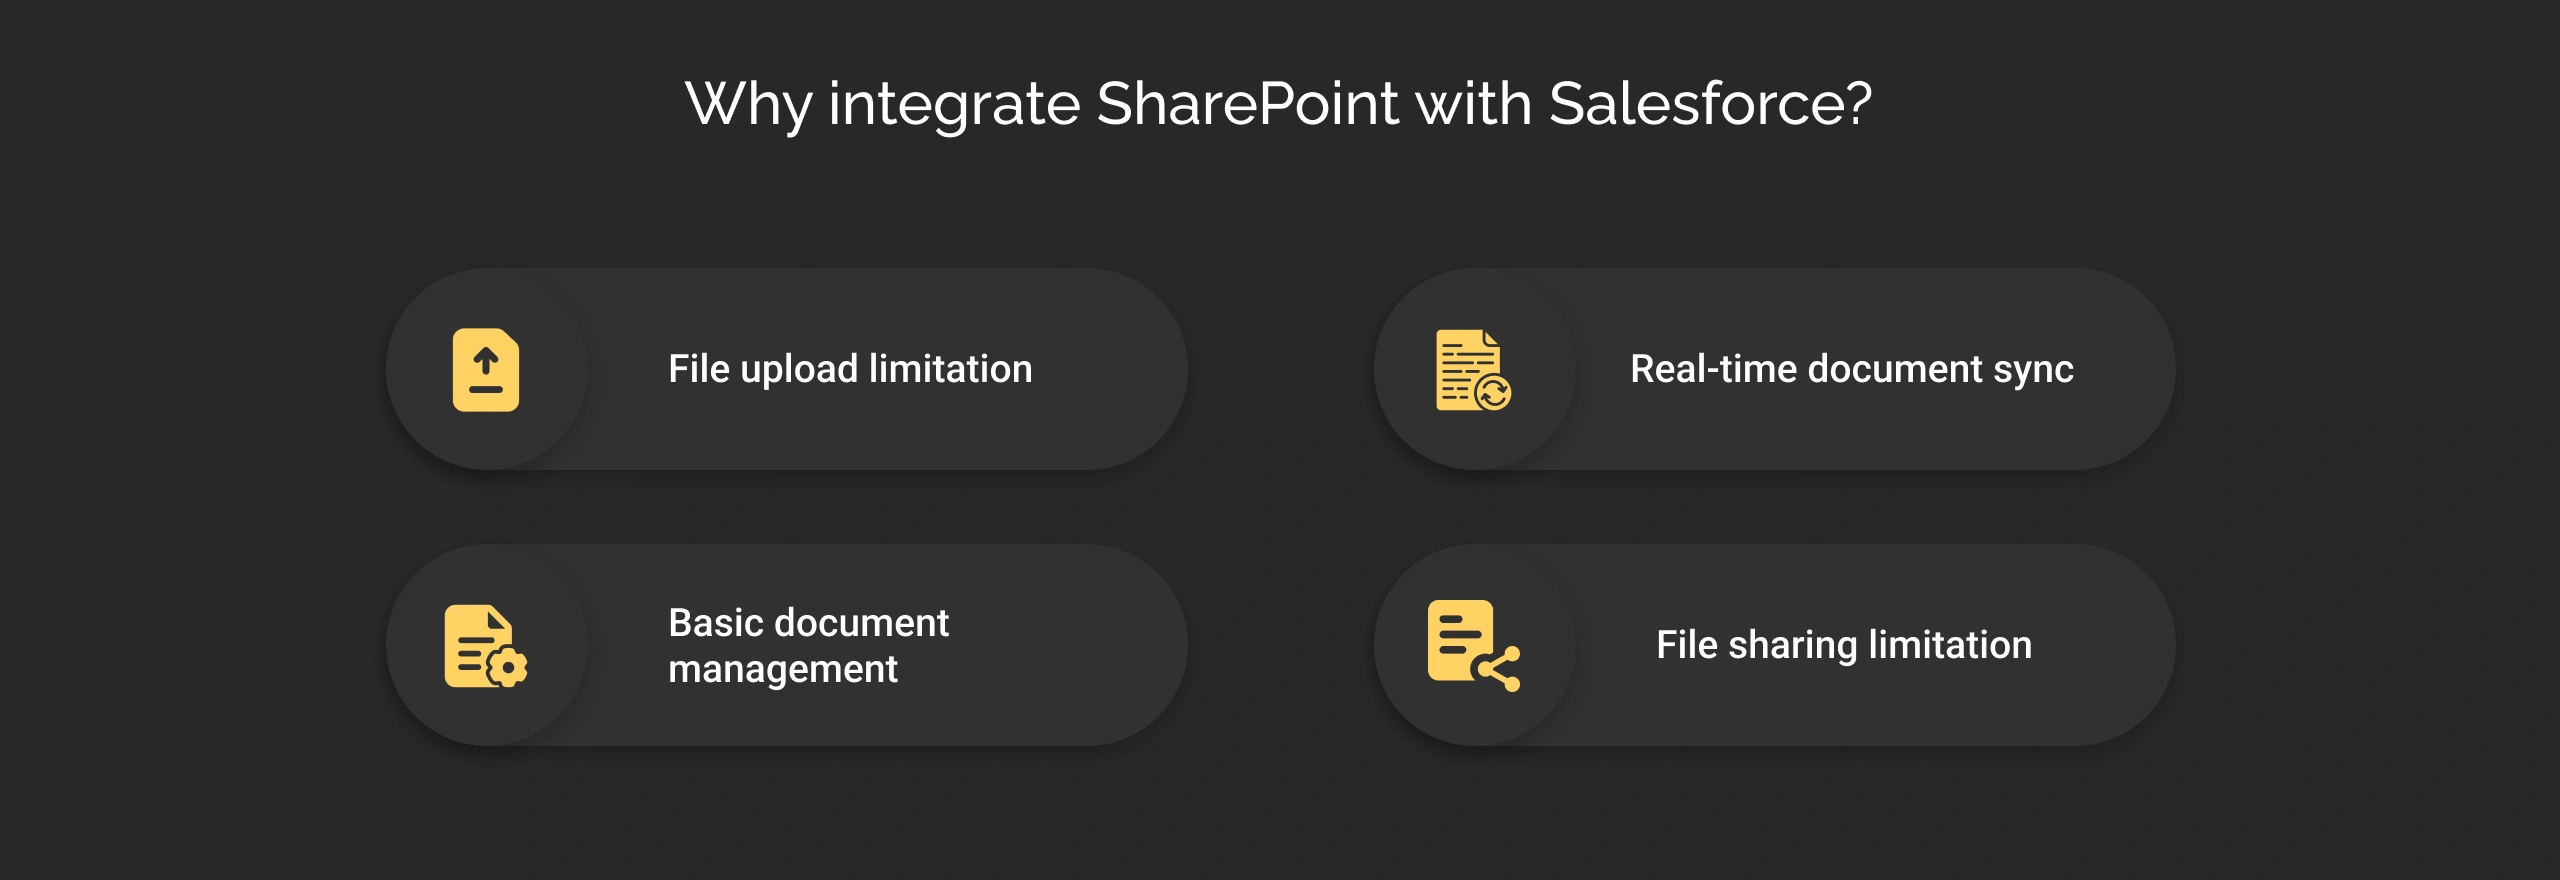
Why integrate SharePoint with Salesforce?
Salesforce is a robust CRM management application and offers a wide range of functionalities, but it also contains some limitations. Users may find challenges related to limited document storage, higher upgrade charges, etc. So, it is clear that companies who want to enhance productivity, have to adopt a system like SharePoint.
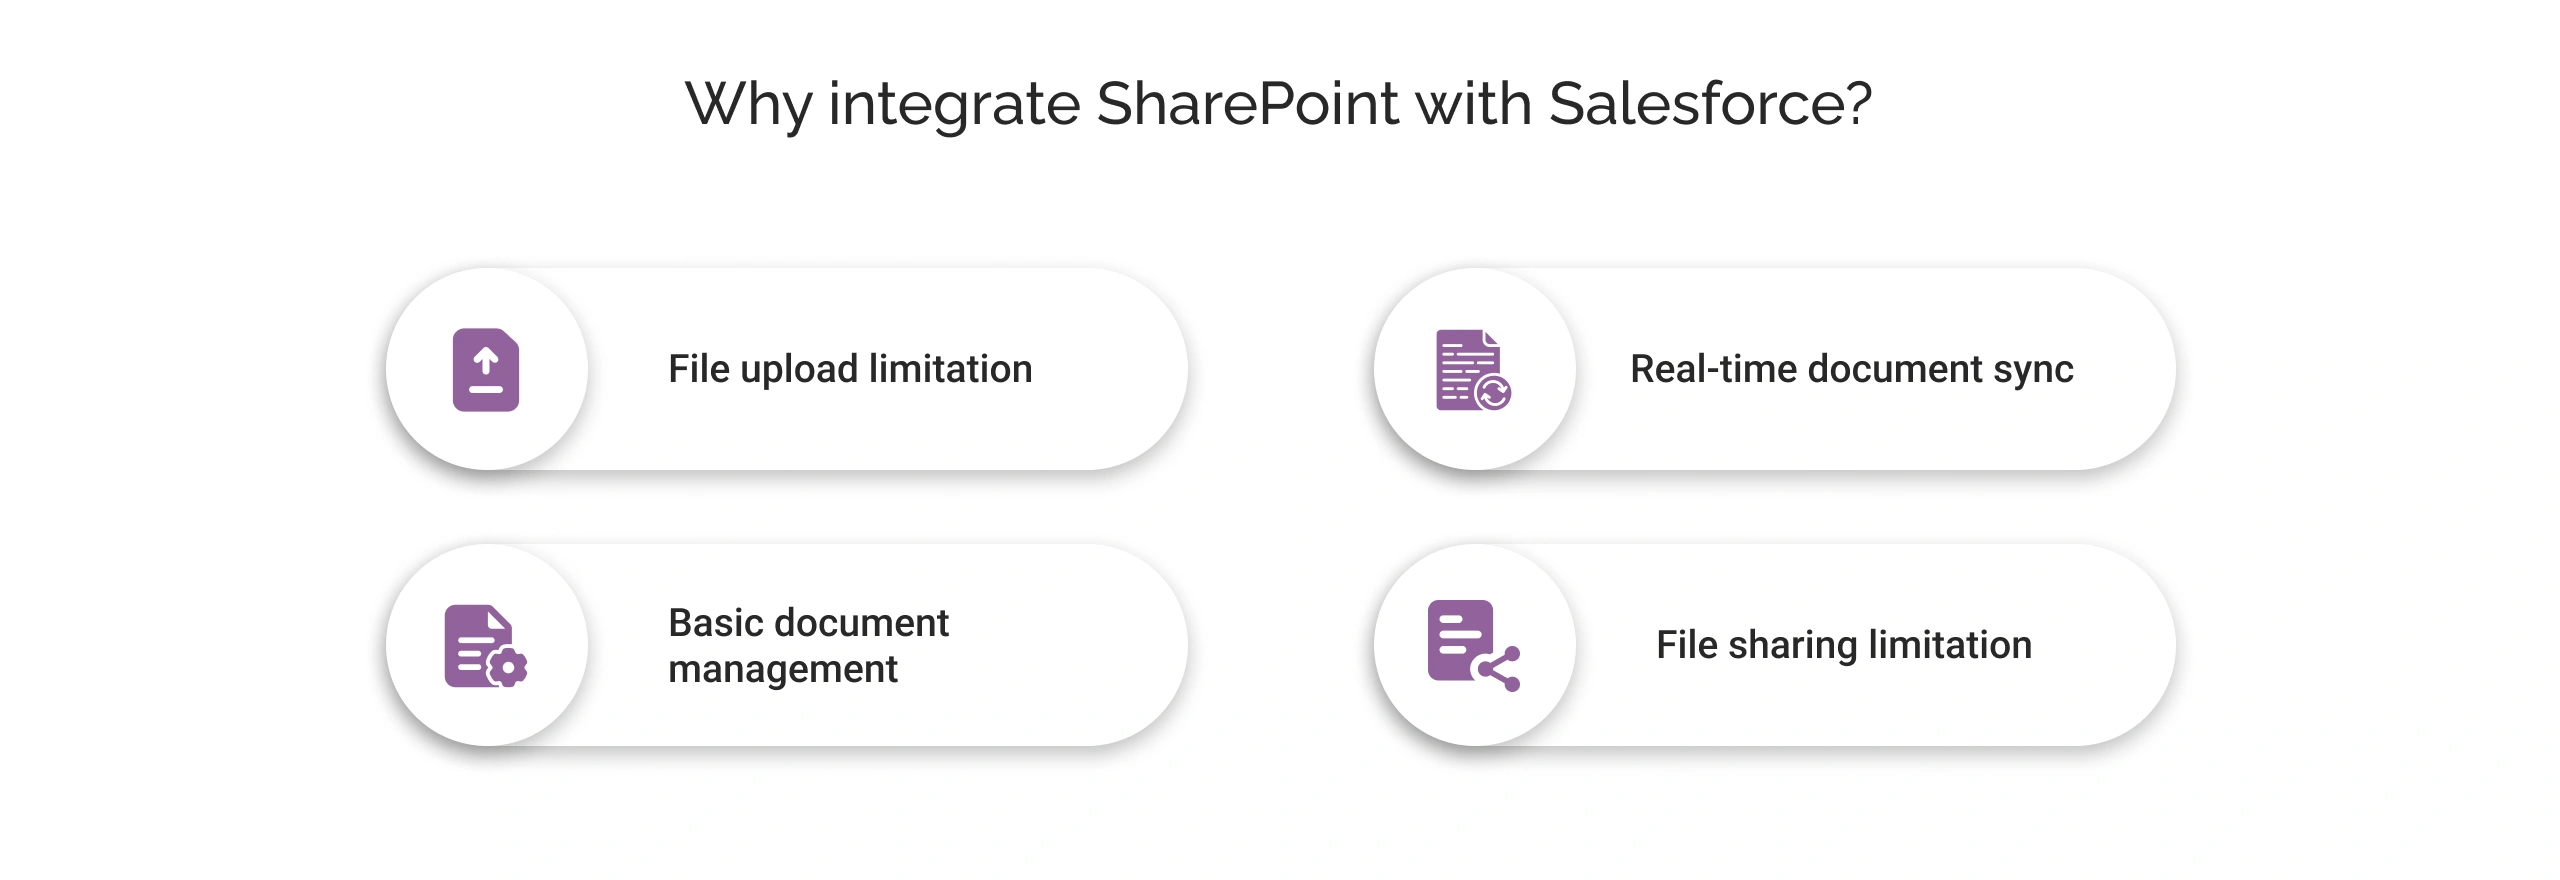
But the question is, is this integration required or not? To help you out we’ve listed down the Salesforce limitations solved with SharePoint Integration.
1. File upload limitation
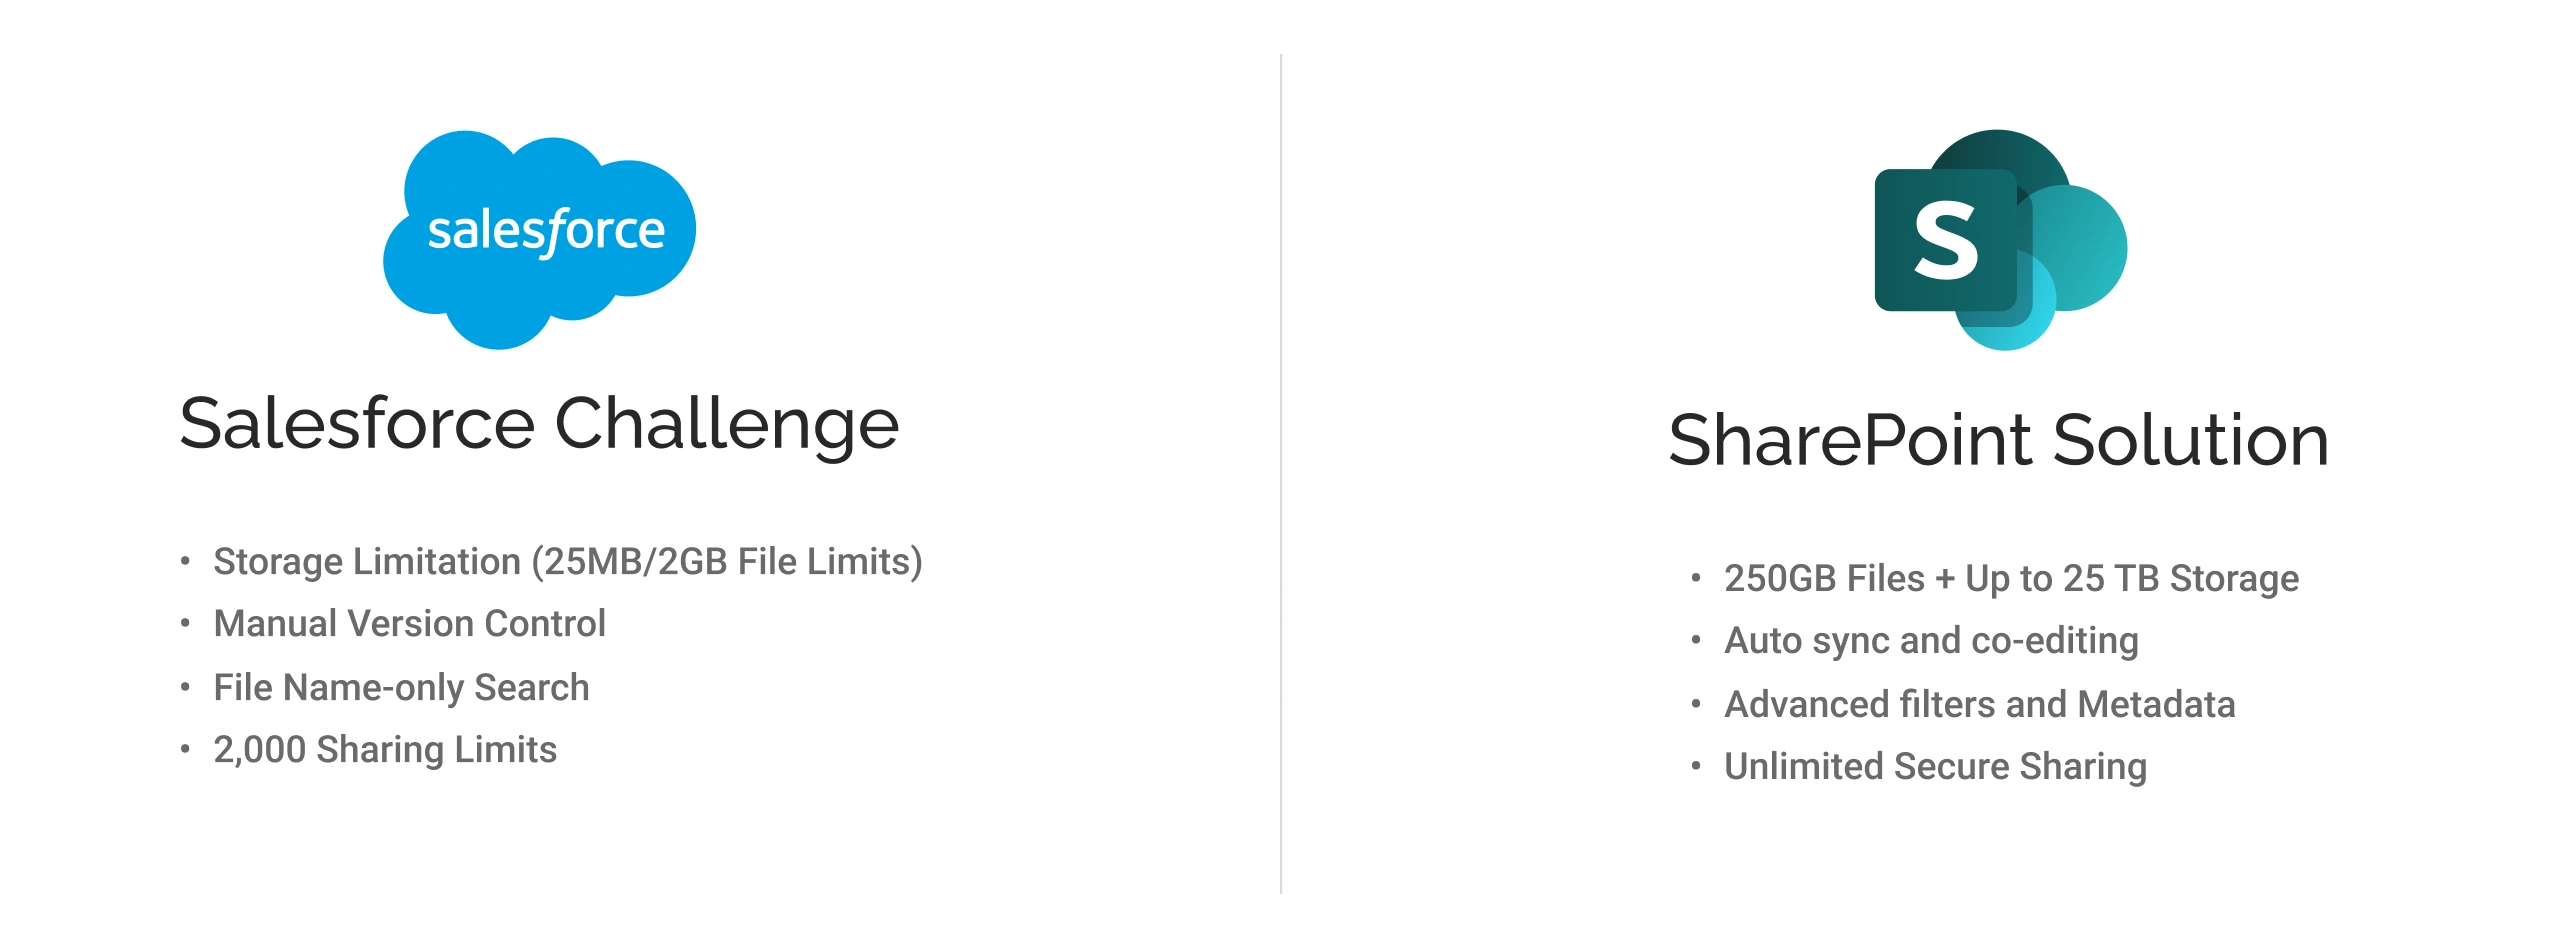
Salesforce provides options to upload documents, including attachments of up to 25 MB and file uploads of up to 2 GB. However, the increased document size compared to this limit also increases storage costs. In addition, it slows down the performance of the system in the long run due to its multitenant architecture.
Solution: SharePoint offers total storage of 1TB (+10GB) per site with extra storage of 25 TB and offers a file upload limit of 250 GB. Integration can eliminate Salesforce storage limits with SharePoint issue seamlessly.
2. Real-time document sync
The changes made by the users in the local drive in Salesforce do not get synced automatically. The only thing users can do is upload or download, then replace it with the new version. It makes it difficult for teams to manage documents properly and delays the decision-making process.
Solution: SharePoint ensures auto sync (changes reflected in Salesforce in real time), providing multiple users with the ability to edit simultaneously and view version history (track changes and roll back mistakes).
3. Basic document management
Salesforce offers only some basic document management features. Also, users can only search and filter documents by name; it does not provide a filter by date. With a lack of advanced document features, businesses often struggle within Salesforce.
Solution: SharePoint allows users to search documents with filters by date, author, and content type. It provides automated approval workflows and custom tags for projects/clients, leading to seamless document management in Salesforce using SharePoint.
4. File sharing limitation
Salesforce only allows file sharing a maximum of 2000 times. The sharing count involves records, people, and group sharing. When the limit is exceeded, businesses have to create a public link for sharing.
Solution: Integration with SharePoint provides unlimited secure sharing without hitting limits or violating compliance. Users can create expiring links and provide view-only access when sharing files.
In short, integration is essential if a business is expanding and wants to save operational costs. Also, getting assistance from Salesforce integration solutions experts ensures a seamless integration journey.
Pre-requisites for Salesforce and SharePoint Integration
To complete SharePoint Salesforce integration, businesses have to meet some requirements. It will ensure a seamless integration process. Here are the prerequisites that enterprises have to follow:
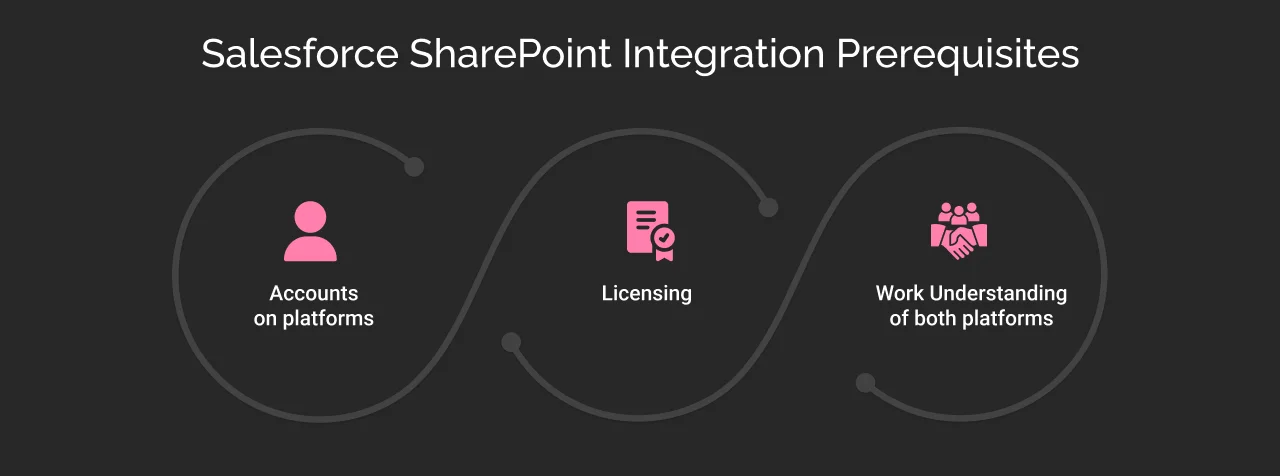
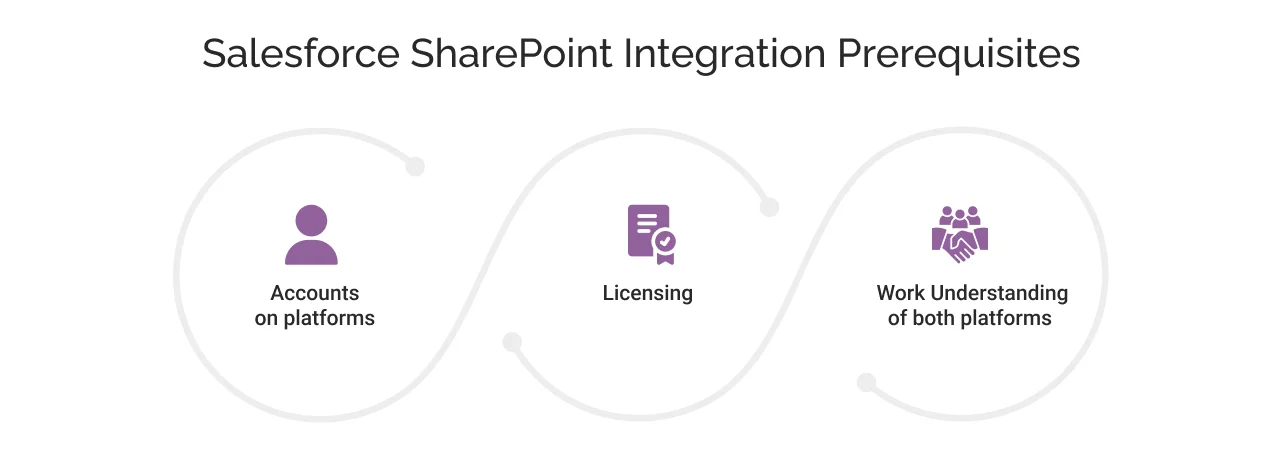
1. Accounts on Platforms
Before going for SharePoint and Salesforce integration, it is essential to have an account (Salesforce System Admin and SharePoint Online Admin profile) on both platforms. In Salesforce, you need a valid subscription with API access.
2. Licensing
Salesforce and SharePoint both have their own agreements and licensing. So, you need to check if your Salesforce org account allows the API integration and SharePoint allows external data access to make seamless integration.
3. Work Understanding of Salesforce and SharePoint
For Salesforce and SharePoint integration, it is essential to have a working understanding of both platforms.
Pro Tip: You can schedule integration during maintenance windows outside business hours.
Before diving straight into the Salesforce Sharepoint integration steps, knowing the checklist is vital for successful integration.
How to Ensure a Smooth Salesforce to SharePoint Integration?
Here are some key pointers that a business should consider before going for Salesforce integration with Sharepoint.
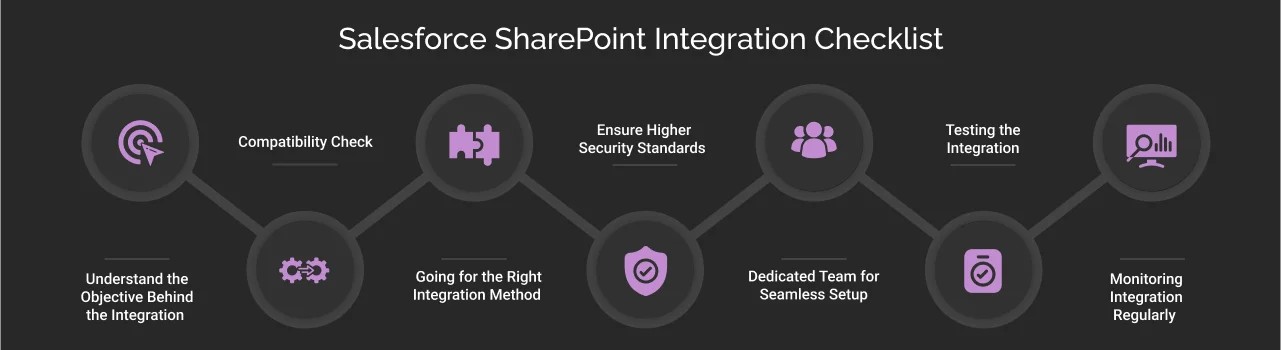

1. Understand the Objective Behind the Integration
Before embarking on the integration of Salesforce with SharePoint, it is crucial to clearly define the objectives driving this initiative. Take the time to outline key motivations such as enhancing document management, streamlining workflow processes, and fostering collaboration among teams.
For instance, there could be an organization that would want to leverage features such as real-time data synchronization, and improved reporting capabilities through this integration.
2. Compatibility Check
Ensuring compatibility between Salesforce and SharePoint is a vital step in the integration process. Verify that the versions of both platforms in use are compatible with each other.
For instance, Salesforce Files Connect is designed to work seamlessly with SharePoint Online, but it does not support older versions like SharePoint 2010 or 2013. Conducting a thorough compatibility check will prevent potential integration issues and ensure a smoother implementation.
3. Going for the Right Integration Method
Selecting the appropriate integration method is critical for a successful outcome. There are primarily two approaches: native integration (using Salesforce Files Connect) and third-party integration solutions. Opting for native integration is often advantageous, as it eliminates the need for additional third-party applications and associated costs. This method typically offers a more streamlined experience and reduces the complexity of the integration process.
4. Ensure Higher Security Standards
Data security must be a top priority during the integration of Salesforce and SharePoint. Implement robust security measures, including strong access controls, multi-factor authentication, and encryption protocols.
Additionally, ensure that your organization’s security policies are in alignment with industry standards and best practices post-integration. This proactive approach will help safeguard sensitive information and maintain compliance with regulatory requirements.
5. Dedicated Team for Seamless Setup
To complete a successful SharePoint and Salesforce integration, businesses need to form a dedicated team for this task. Also, the team should have members who have experience working on both tools. This will ensure the team addresses potential issues before deployment and lead to a seamless integration.
6. Testing the Integration
Only integrating Salesforce and SharePoint is not the final step, from here businesses should conduct thorough testing in a sandbox environment. It will ensure that users can use the integration capabilities properly or not. Additionally, identifying implementation against real-world problems can ensure smoother workflows and fewer misconfiguration issues in the future.
7. Monitoring Integration Regularly
Another crucial thing in a successful integration is keeping regular checks to help remove potential issues. Also, getting real user feedback ensures to make improvements when identifying bottlenecks. It will eventually help users to get a seamless user experience.
Bonus Tip: User Training is Crucial
Apart from seven checklist pointers, businesses should provide training to users to utilize the capabilities of integration effectively. It can be helpful to train your team to use different features to drive productivity.
Read More: Complete Guide to Salesforce Data Integration
Ways to integrate Salesforce and SharePoint
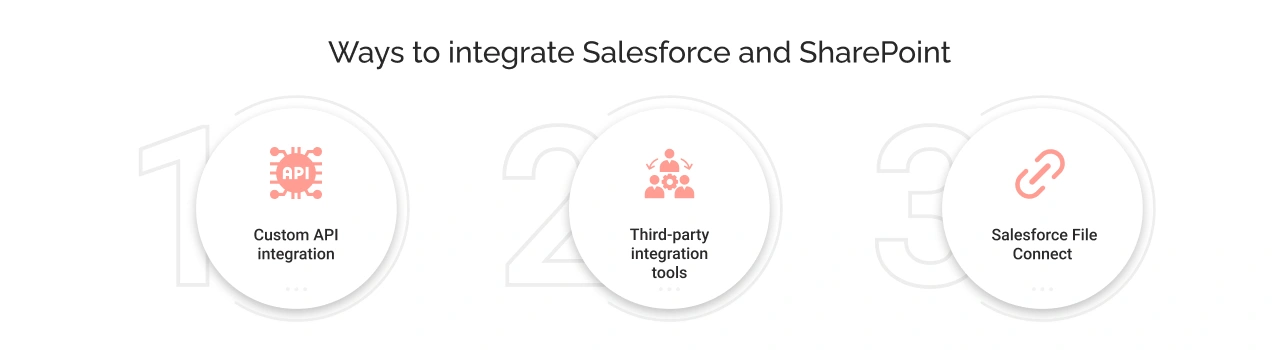
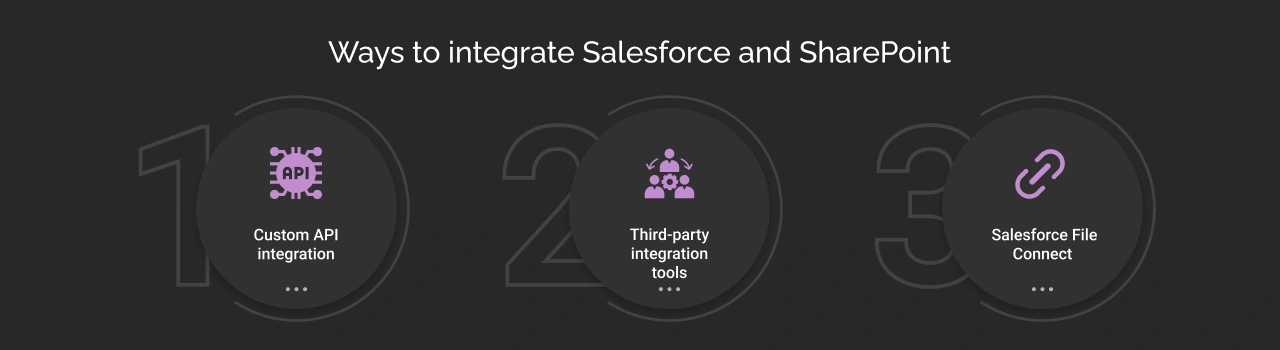
There are multiple ways to carry out Salesforce and SharePoint integration. Let’s take a look at some of the ways in detail;
1. Custom API integration
The first method is a custom API integration to connect the two platforms. The following are the pros and cons of choosing this approach:
Pros:
- This method is suitable for businesses needing customized solutions tailored to their needs and necessities.
- Businesses need complete control over the synchronization of data and permission access.
- Most importantly, this approach also supports scalability for complex workflows.
Cons:
- Since everything is custom-made, the time, money, and effort required are significant.
2. Third-party integration tools
Here are the merits and demerits of connecting the two platforms via third-party integration tools:
Pros:
- Third-party integration tools, such as Zapier, can streamline the integration process by providing access to enhanced functionalities (no-code automation/ drag-and-drop interface) that simplify integration.
- In addition to ease of use, these tools offer greater flexibility and customization options, allowing them to meet specific organizational needs effectively.
Cons:
- Multiple third-party tools require additional licenses that would require an organization to incur additional costs.
- Using these tools increases the third-party vendor’s dependency, along with some technical complexities that might need some assistance from experts.
Salesforce File Connect
Salesforce Files Connect is a built-in Salesforce feature that allows users to securely access and share files from external storage systems (e.g., SharePoint, OneDrive, Google Drive, etc.) directly from the Salesforce platform without switching apps.
Simply put, Salesforce Files Connect creates a secure bridge between SharePoint and Salesforce. Users can access SharePoint files from Opportunities, Accounts, and Custom objects.
These are the advantages and disadvantages of integrating Salesforce and SharePoint using Salesforce File Connect.
Pros:
- This is a Salesforce native platform, which makes the setup process easier with no additional subscription costs (included in Salesforce licenses).
- The platform also offers real-time sync and a familiar user interface (UI) that eventually boosts the user’s productivity.
Cons:
- The integration process may require technical assistance from certified Salesforce integration partners to address certain complexities.
| Salesforce SharePoint Integration Methods Comparison |
| Method | Pros | Cons |
|---|---|---|
| Custom API | • Full customization • Bidirectional sync | • High-development cost • Require ongoing maintenance |
| Third-party tools | • No-code setup • Prebuilt templates • Faster than APIs | • Vendor lock-in • Recurring fees |
| Salesforce Files Connect | • Free (native) • Real-time sync • No new UI to learn | • SharePoint online version only |


How to Connect SharePoint to Salesforce: Steps-by-Step Process
Here is the step-by-step guide to Salesforce SharePoint integration.
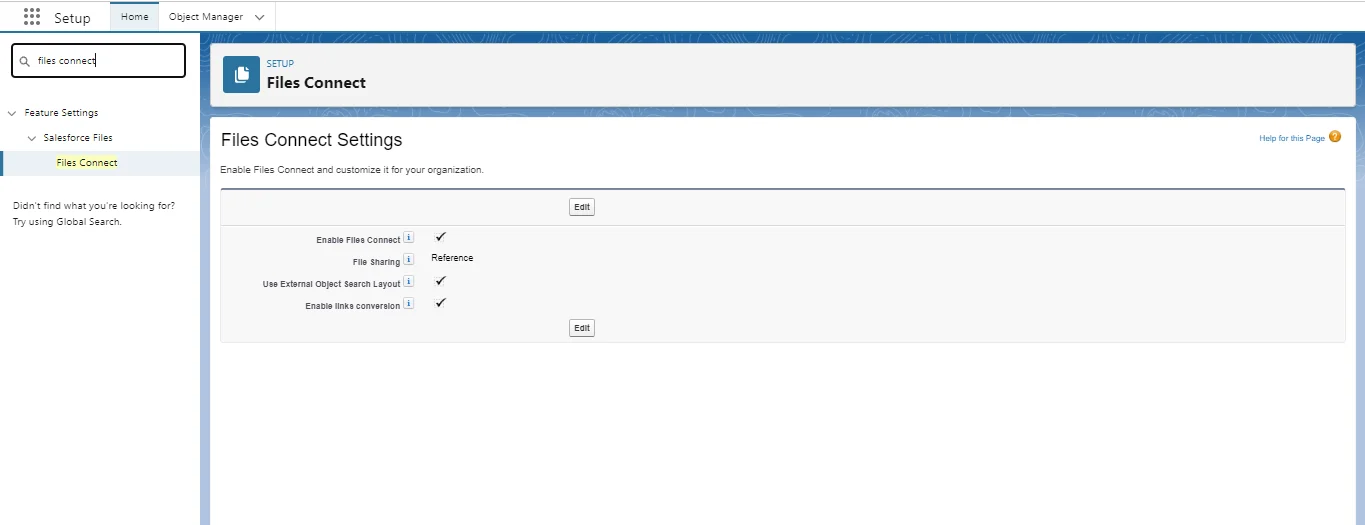
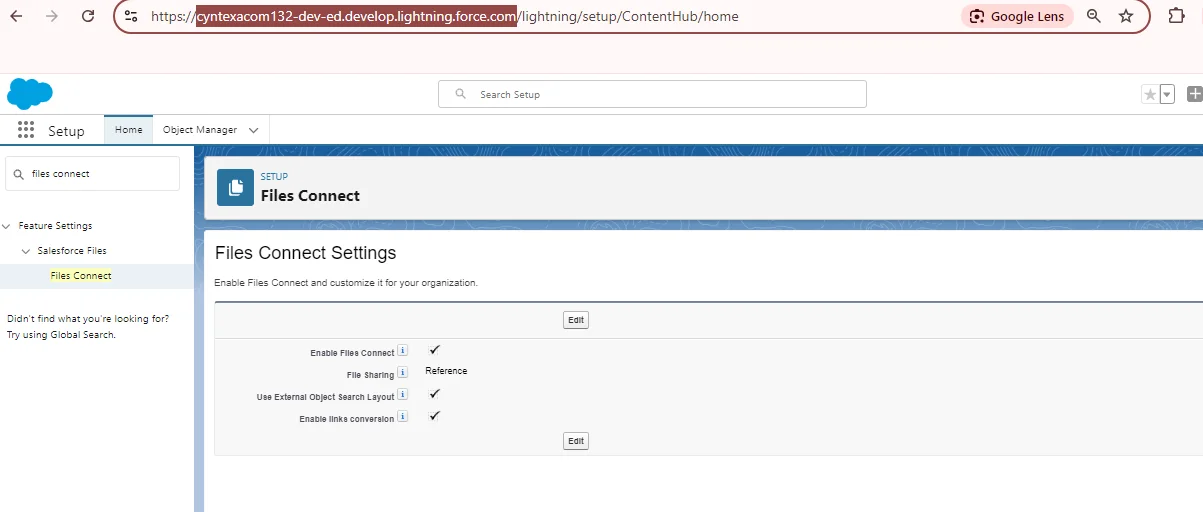
Step 1: Enable Files Connect in Salesforce
(a): Open your Salesforce Org account and search Salesforce Files Connect from the homepage quick find box.
(b): Go to files connect and enable “Use external object search layout.”
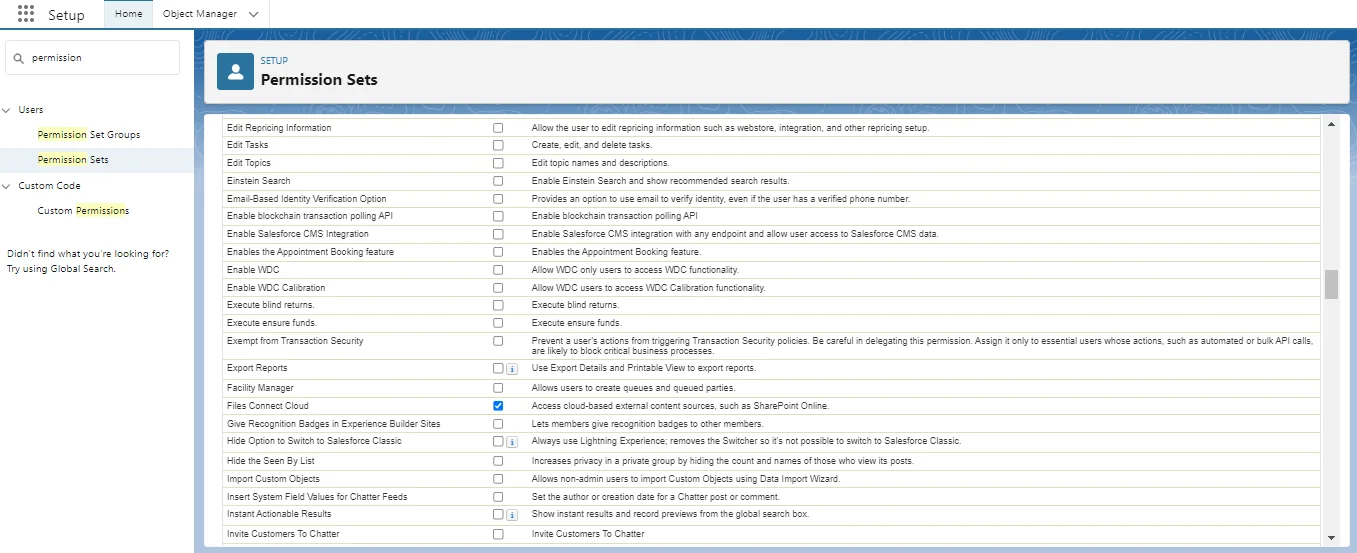
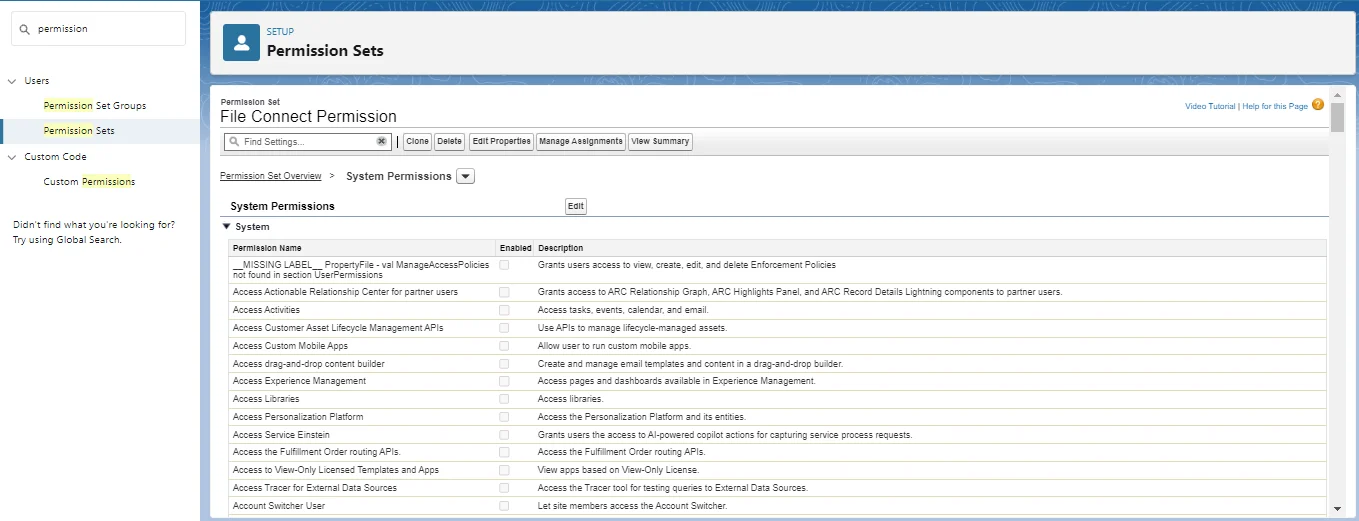
Step 2: Create a new permission set & enable Files Connect Cloud
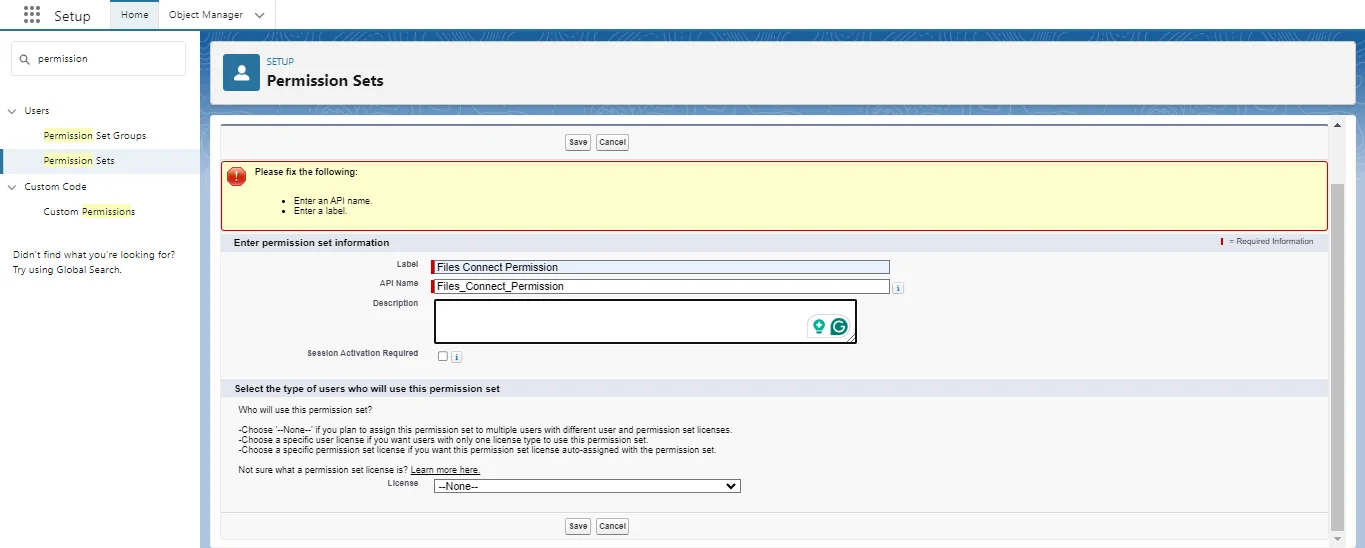
(a): Now search for “Permission Sets” from the quick find box and create a new permission set.
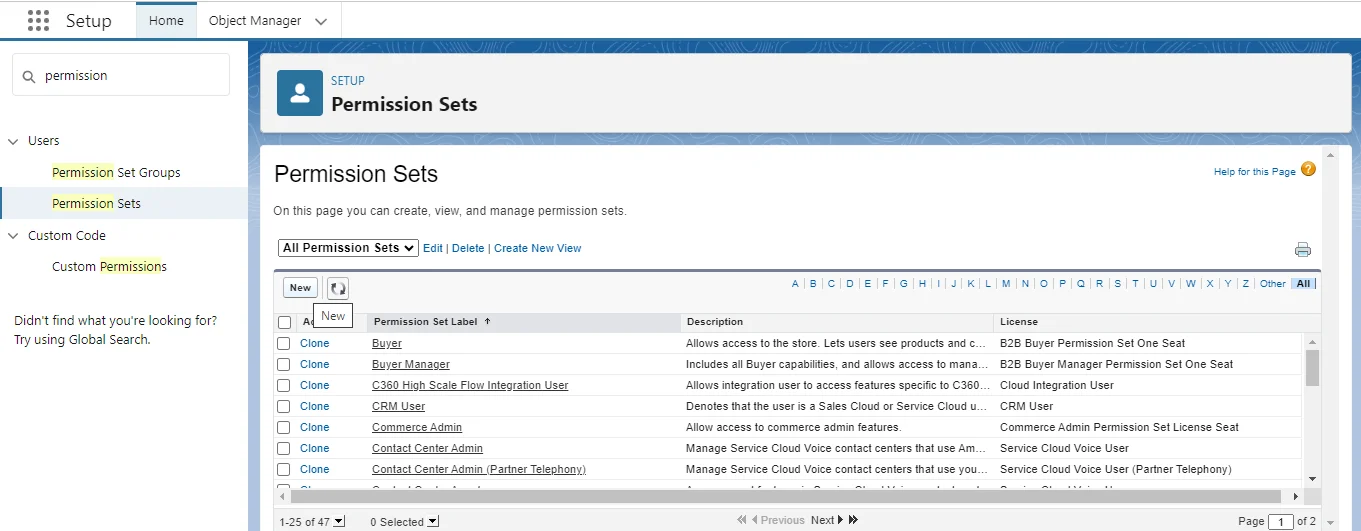
(b) Add Label and API name such as Files Connect Permission and choose license type for none or specific license and save the permission.
(c) Now, scroll down and click on “System Permissions.” and click on edit
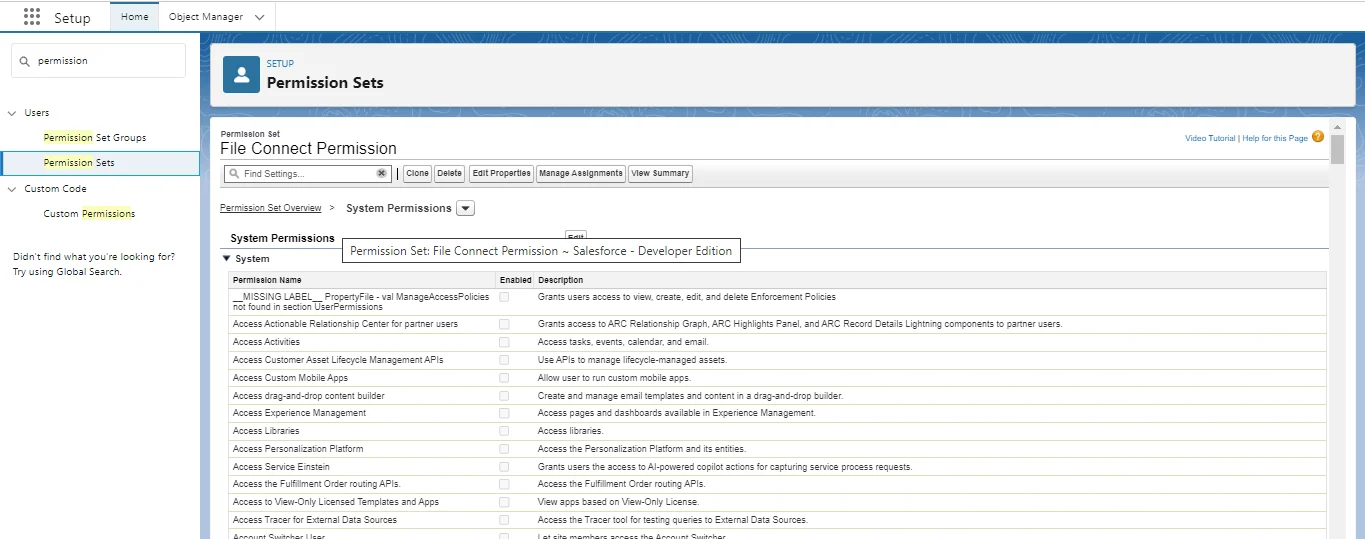
(d) Now scroll to find “Files Connect Cloud” and click to enable and save them.
Step 3: Configure user permissions
(a): After saving, you are redirected to “Permission Sets,” and select “Manage Assignments.”
(b) Now, click “Add Assignments” from the right corner and choose the specific user who wants Files Connect Access.
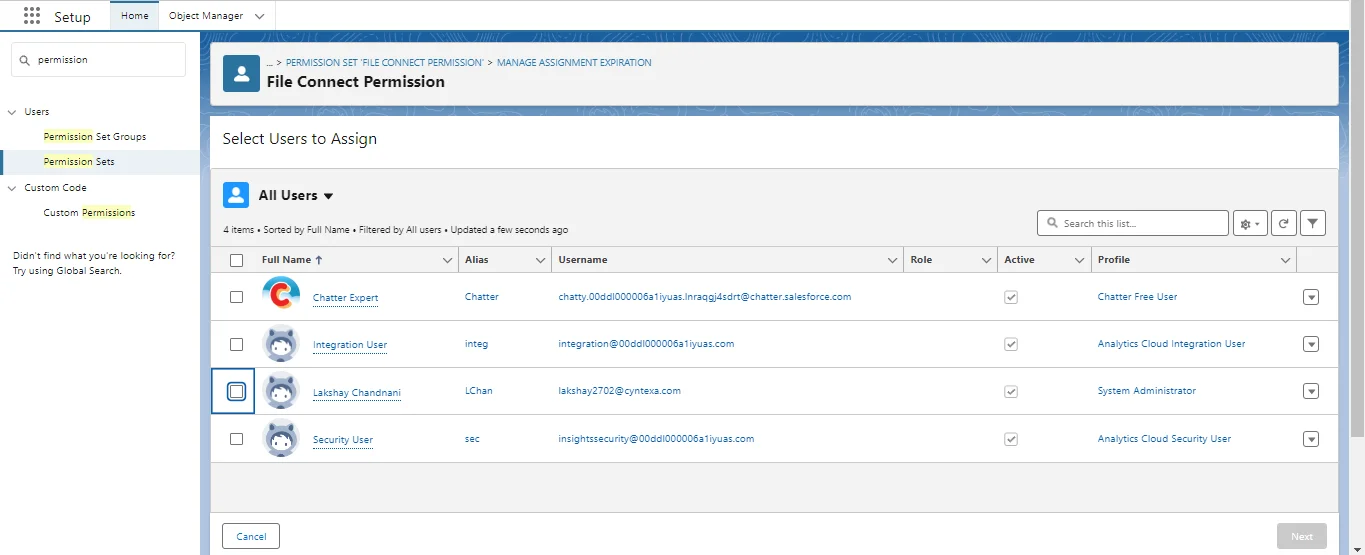
(c) After selecting the user, now click on “Next” and you are redirected to the next page, select the expiration date or specify it and click on Assign.
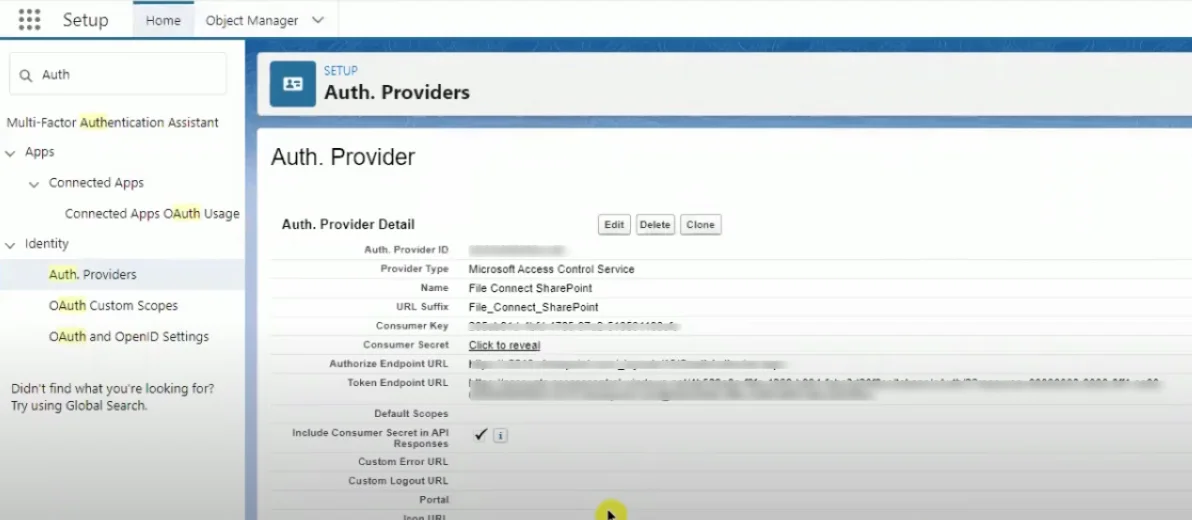
Step 4: Create Auth Provider
(a): Now search for “Auth. Providers” from the quick find box.
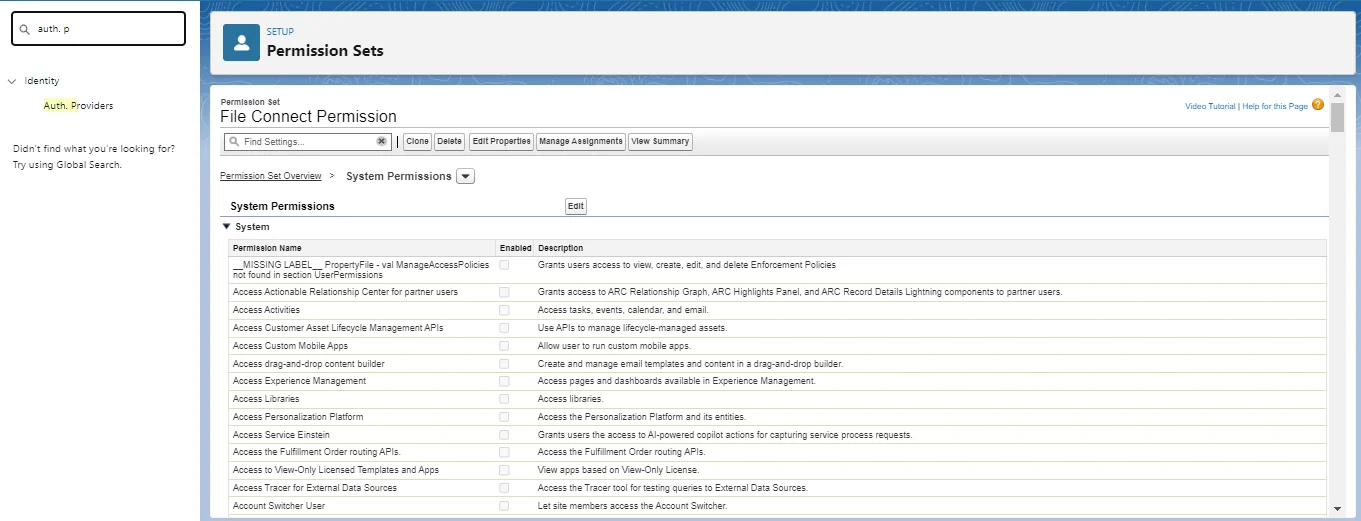
and click on “New”.
(b) Create Auth. Provider type: Choose “Microsoft Access Control Services”.
- Now, you have to enter the Name (You want to appear in Salesforce).
- You have to create a “URL Suffix” or by default, it reflects the name.
- Create a “Consumer Key and Consumer Secret”.
- You have to write “Authorize Endpoint URL” and “Token Endpoint URL” which must begin with https.
- Now, rest you can leave empty. Remember these all entries are for testing, we will find out from SharePoint and fill these entries again.

After saving, you will get Salesforce Configuration URLs like Test-Only Initialization URL, OAuth-Only Initialization URL, Callback URL, and Single Logout URL.
Step 5: Establish SharePoint connection
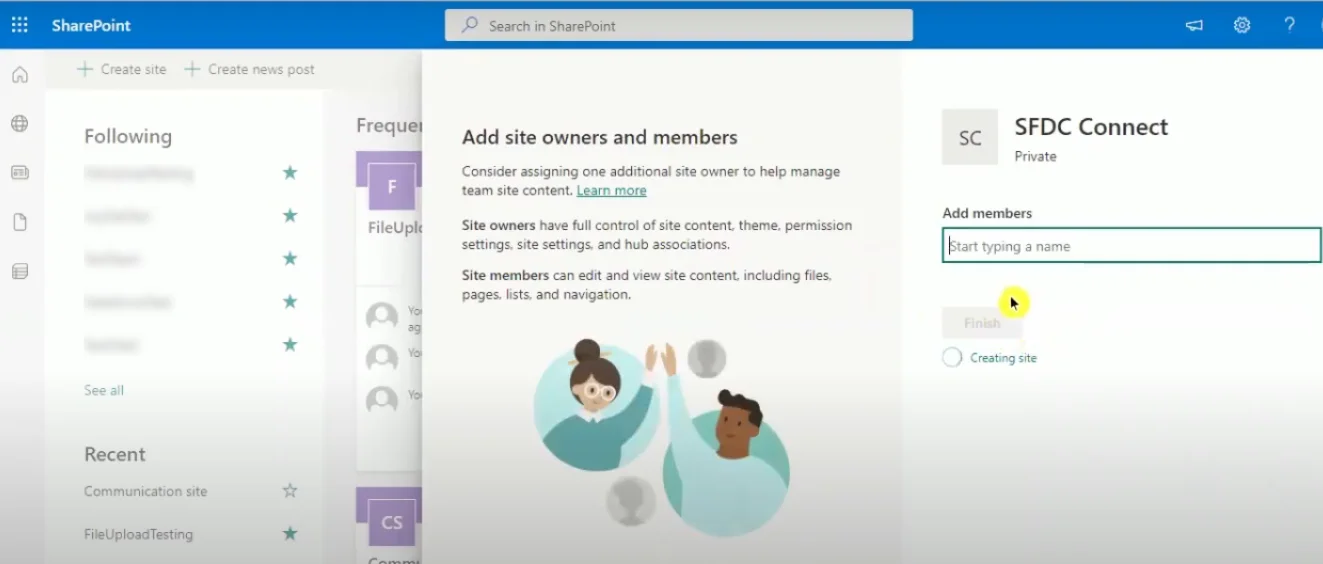
(a): Now, open the SharePoint account in the new window and create a Team Site with the name you want such as SFDC connect.
(b) Now, you have to change the URL from the end and paste (https://(orgID Name).sharepoint.com/_layouts/15/appregnew.aspx). This will redirect you to the next page:
(c) Now simply, create a Client ID and Client secret.
- In the title, you can add File Connect. Now, you have to add the “App Domain” shown in the image (your salesforce org id url).
(d) In the Redirect URL, you have to add the Callback URL that we have in Salesforce Auth Provider as the Setback URL.
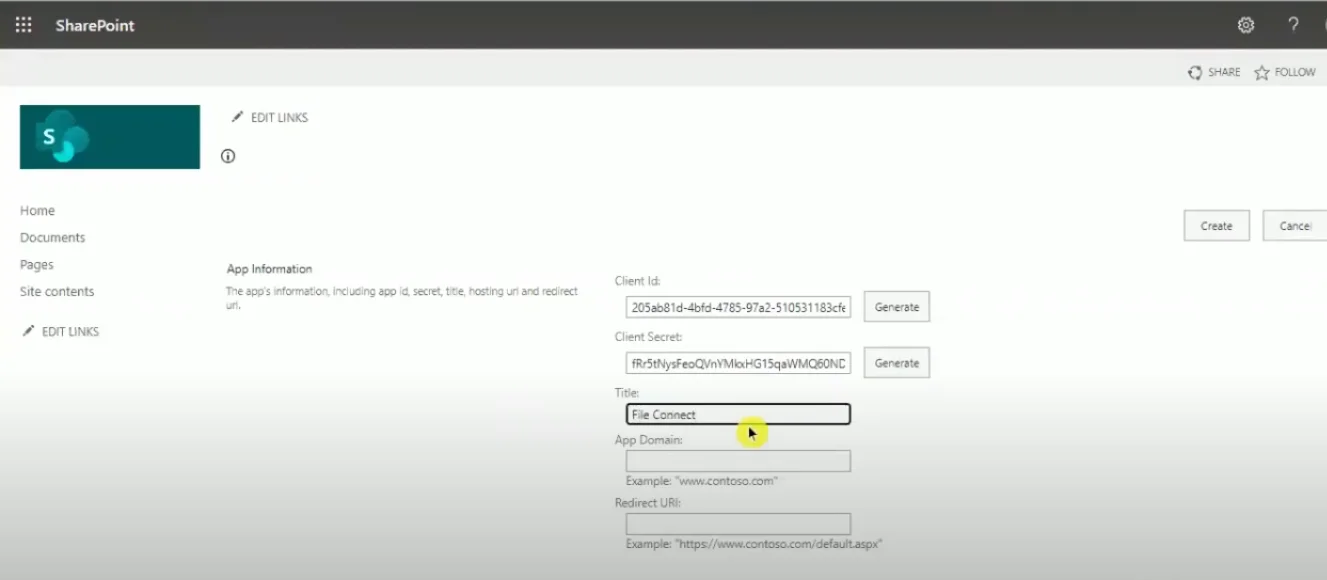
(e) After adding the information, you have to click on register and you will be redirected that your app identifier has been successfully created.

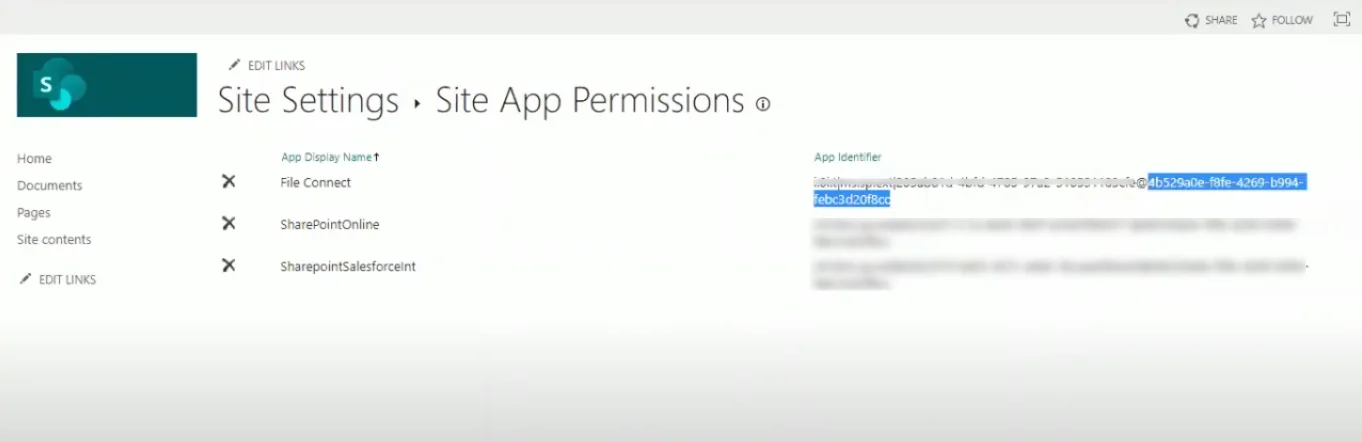
Step 6: Granting permissions in SharePoint
(a): The next step is granting permission for this newly created site.
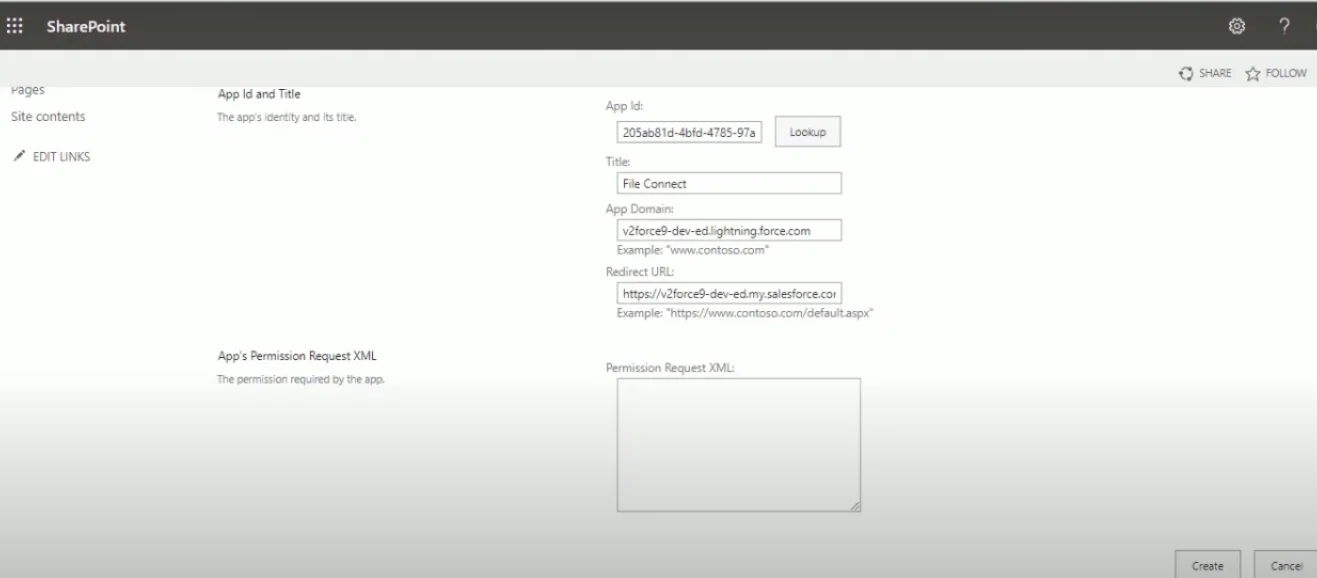
- You can simply go to (https://Org Admin ID.sharepoint.com/_layouts/15/appinv.aspx).
- Then, you will be redirected to a page, here you have to add App ID (put the client ID), Title (add Files Connect), App Domain, and Redirect URL (Same as the previous step).
- Add this to create the App Permission Request XML (<AppPermissionRequests AllowAppOnlyPolicy=”true”>, <AppPermissionRequest Scope=”http://sharepoint/content/tenant” Right=”FullControl” />, </AppPermissionRequests>).
(b) Creating this will redirect you to the page shown in the image. The highlighted part is the Token ID that you need for the Token Endpoint URL.
(c) Now, you can create the Authorize Endpoint URL and Token Endpoint URL as like the image
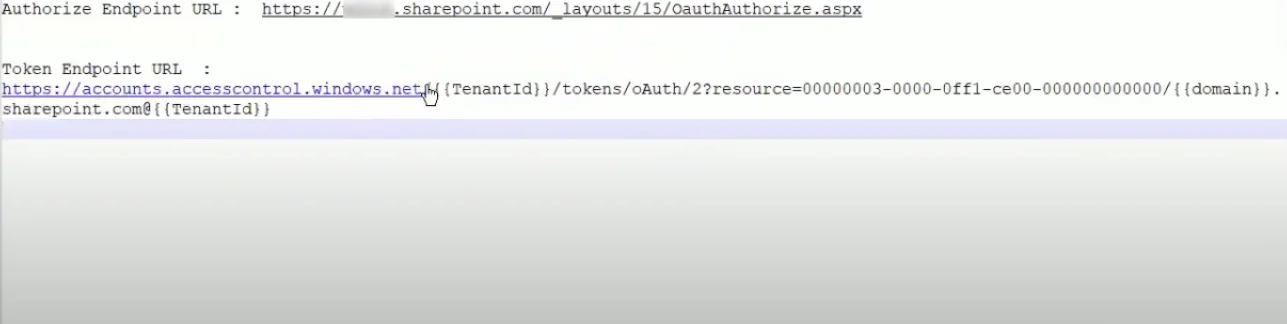
(d) Now, you have to change all the data that we just got including Authorize Endpoint URL and Token Endpoint URL that you get from the SharePoint platform. Save all the changes.
Step 7: Create External Data Sources in Salesforce
(a): Now, search from the quick find box “External Data Sources”. Create new external data sources.
(b) Fill in External Data Sources “Files Connect” then the name will fill automatically and select in type “Files Connect: Microsoft SharePoint Online”. Now you have to share the site URL of your SharePoint account.
(c) In the Identify Type, you have to choose “Per User” and Authentication Protocol “OAuth 2.0” and search Authentication provider to File Connect SharePoint and save.
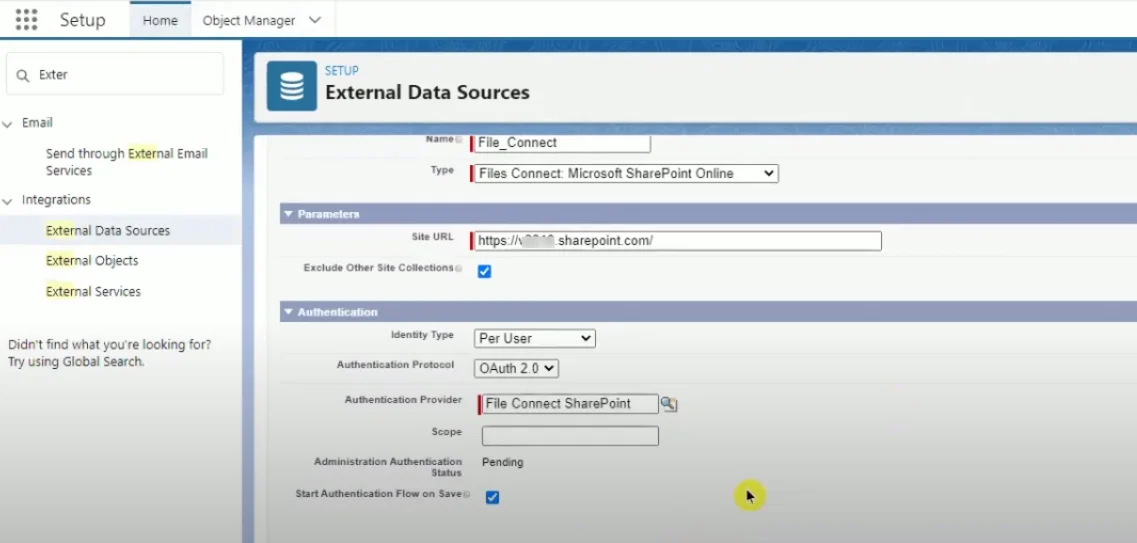
(d) Now it will redirect you to the page, here you have to click on “Trust IT”.
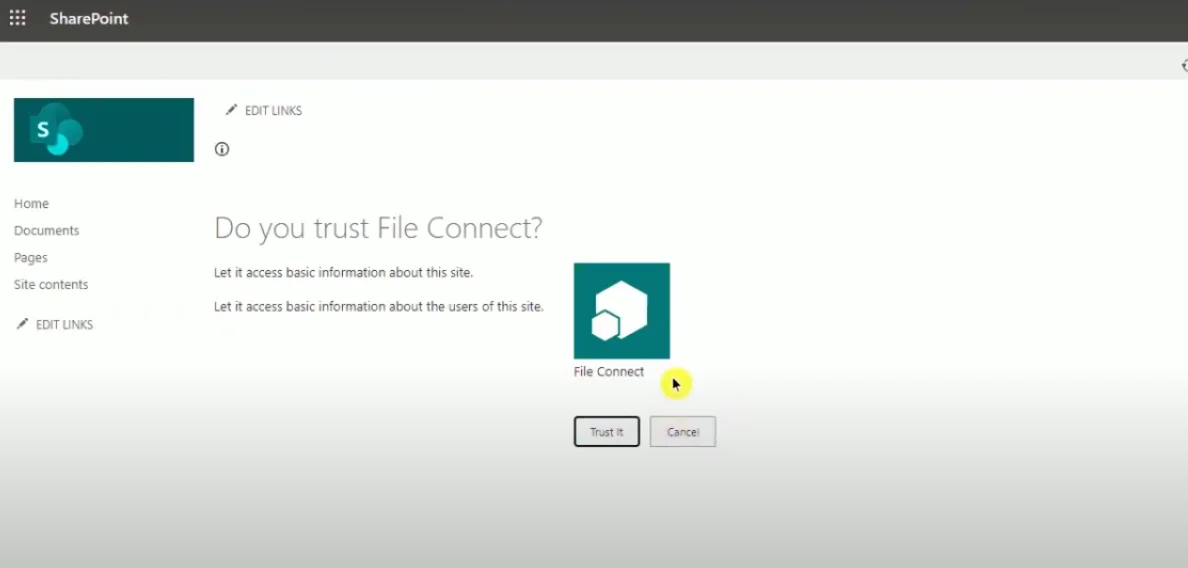
That’s it, you have completed the setup of integrating Salesforce to SharePoint. You can now directly search from Quick Find for File Connect and find it. This will help your business get numerous benefits.


Common Mistakes When Integrating SharePoint with Salesforce (And How to avoid them?)
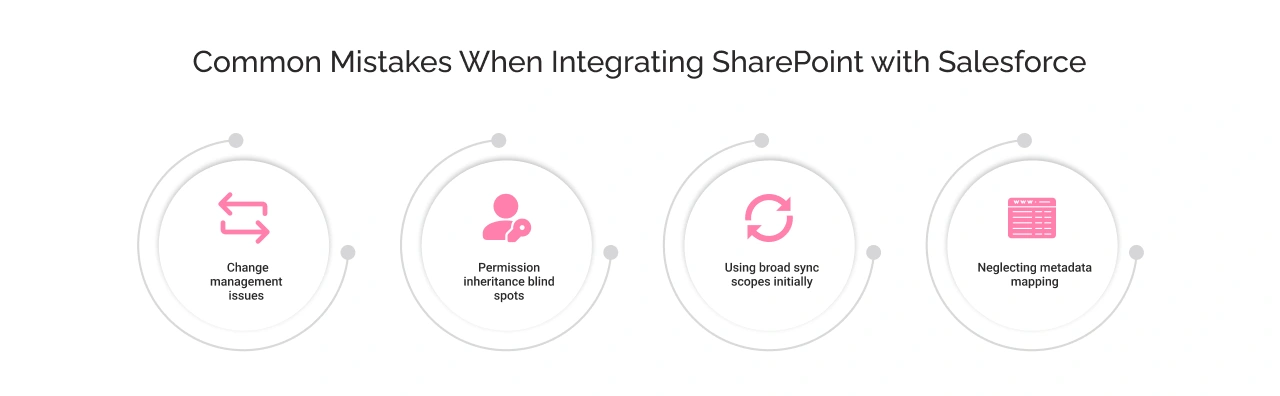
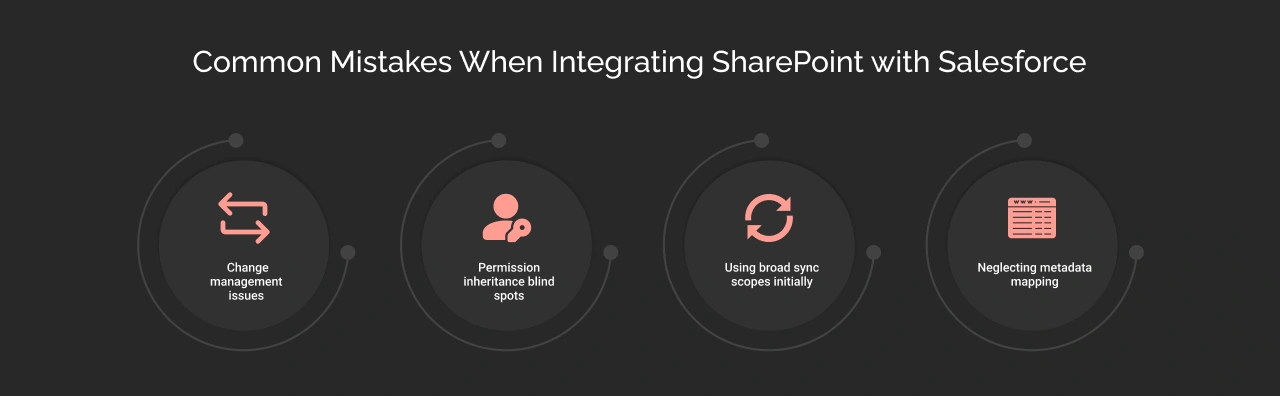
1. Change management issues
Mistake: Many organizations roll out full integration without proper testing phases, resulting in data inconsistencies and sync, API limitations, and the complexity of managing multiple systems. It also leads to inaccurate reporting, breaking existing integrations, and requiring specialized knowledge.
Solution: Rolling out org-wide pilot testing with a phased adoption ensures data consistency and streamlines integration. Also, conducting an integration impact workflow before launch can help align departmental workflows.
2. Permission inheritance blind spots
Mistake: Not auditing SharePoint default permissions, like inheritance allowing external sharing without expiration dates, can lead to data breaches and non-compliance.
Solution: You can set up a default 7-day expiry for all SharePoint links synced to Salesforce. It also provides a compliance bonus for following GDPR “right to be forgotten” requirements.
3. Using broad sync scopes initially
Mistake: Connecting entire SharePoint document libraries instead of targeted folders triggers Salesforce API limits and slows down sync.
Solution: Instead, start with a high-priority folder and enable versioning from SharePoint’s library settings to exclude draft items from syncing until finalized.
4. Neglecting metadata mapping
Mistake: Not aligning SharePoint’s column with Salesforce’s field renders searches useless, leading to manual tracking of files. If you do not properly align the version tracking fields between the two systems can cause search failure.
Solution: Identify critical metadata fields for cross-platform mapping and use SharePoint’s column indexing to accelerate searches within Salesforce.
Benefits of Salesforce and SharePoint Integration
Building the bridge between Salesforce and SharePoint can be valuable and offer numerous benefits to businesses.
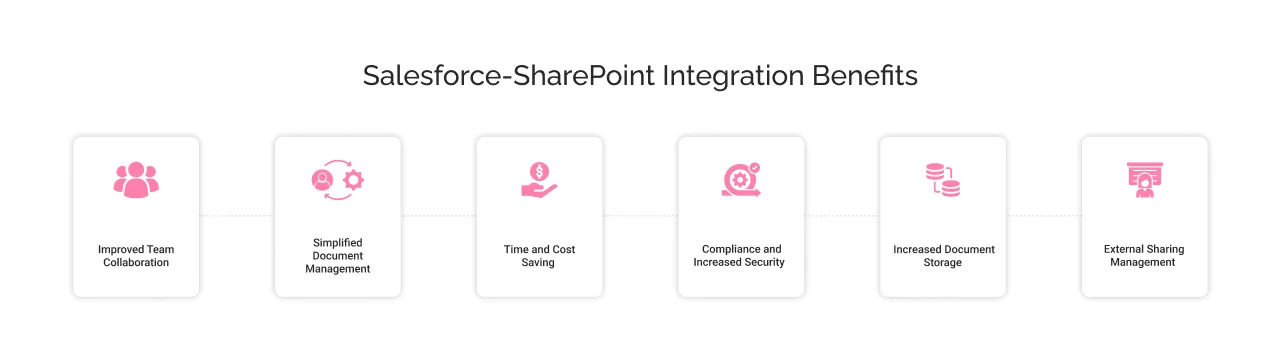
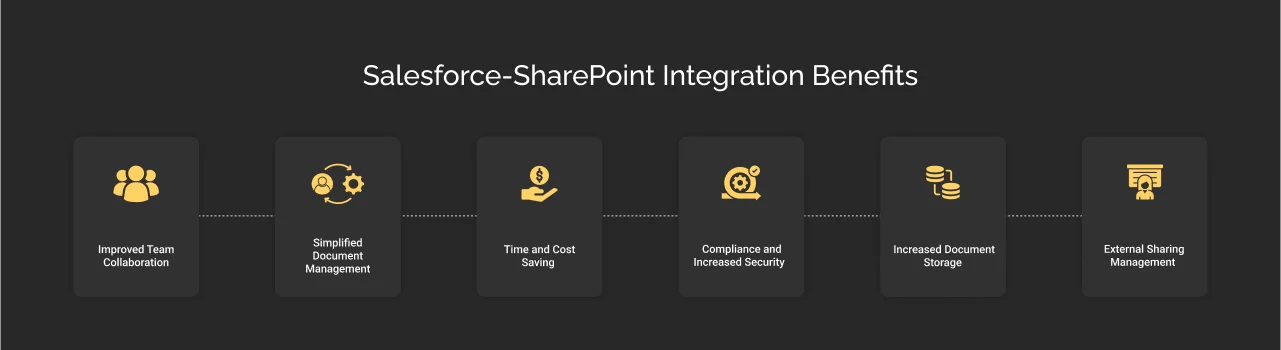
1. Improved Team Collaboration
SharePoint integration with Salesforce improve team coordination and facilitate increased productivity. It allows teams to share, manage, and access all the documents within Salesforce with SharePoint capabilities.
It provides real-time access to customer documents and information, ensuring users get the latest updated data. This eventually improves their project delivery and outcomes without taking a long time.
For example, if there’s a sales representative in New York collaborating with a marketing team in London. The representative can simultaneously edit a proposal document stored in SharePoint. This real-time access ensures that everyone is on the same page, leading to quicker decision-making and improved project delivery.
2. Simplified Document Management
This integration streamlines document management. While Salesforce limits document access to ensure security, implementing both tools streamlines this process. SharePoint offers wide and secure accessibility to authorized users as per their role. For some businesses, Box Salesforce integration can also serve as a lighter alternative for content management, but when enterprises need stronger version control, compliance, and structured collaboration, SharePoint usually becomes the preferred choice.
3. Time and Cost Saving
Integrating these platforms saves much time by making a seamless transition from one to another file. By storing all data in one place, it minimizes the time that ruins searching files on different platforms.
The integration provides a fast and secure way to share data with clients. Also, it reduces a lot of the amount that causes formalities and transfers data from one to another platform. With integration, businesses do not have to pay any extra money and eventually get a fast and secure environment.
4. Compliance and Increased Security
The integration supports ensure compliance with security and regulatory compliance. It enables consistent data monitoring and provides a unified view, enhancing data protection and minimizing potential data breaches. Integration increases the ability of secure data management and is eventually helpful to regular data governance from the Salesforce environment.
5. Increased Document Storage
While Salesforce document storage is limited and requires higher costs for more storage, integrating it with SharePoint extend the extensive storage capacity of the Salesforce system. In addition, it can be highly valuable and cost-saving when businesses grow and require more document storage space for management.
For example, a healthcare organization can use the integration to monitor patient data access and ensure that only authorized personnel can view sensitive information.
6. External Sharing Management
The integration empowers the capabilities of SharePoint such as link expiry control, temporary access control, etc. It allows businesses to set a one-time authentication passcode to provide external users with temporary access. Apart from this, they can set view-only access to reduce unauthorized risks.
The integration enables businesses to get optimal results and streamlines document generation and management.


Conclusion
Salesforce SharePoint integration provides a unified system for businesses that want to streamline document management and team collaboration. This will combine the capabilities of both tools that will allow businesses to enhance overall productivity.
However, this integration will require technical expertise to configure permission sets, OAuth tokens, and metadata mapping while maintaining data integrity & compliance, and optimizing for costs. At Cyntexa, we offer custom Salesforce integration services to help with tailored solutions for your business needs.
Don’t Worry, We Got You Covered!
Get The Expert curated eGuide straight to your inbox and get going with the Salesforce Excellence.
AUTHOR
Vishwajeet Srivastava
Salesforce Data Cloud, AI Products, ServiceNow, Product Engineering
Co-founder and CTO at Cyntexa also known as “VJ”. With 10+ years of experience and 22+ Salesforce certifications, he’s a seasoned expert in Salesforce Data Cloud & AI Products, Product Engineering, AWS, Google Cloud Platform, ServiceNow, and Managed Services. Known for blending strategic thinking with hands-on expertise, VJ is passionate about building scalable solutions that drive innovation, operational efficiency, and enterprise-wide transformation.


Cyntexa.
Join Our Newsletter. Get Your Daily Dose Of Search Know-How
Frequently Asked Questions
SharePoint and OneDrive both are cloud-based platforms that allow you to manage and share files. However, these services are different from each other as SharePoint is ideal to use for working as a part of an organization or group. On the other hand, OneDrive is suitable for private work whose sole purpose is to view files.
Conga Composer Connector for Salesforce is the best document management tool other than SharePoint. It automated document generation with vast data from any custom Salesforce object. Additionally, it automates tedious business processes to complete work faster and easier within the Salesforce environment.
Salesforce and Microsoft have a partnership to help users boost productivity. To fulfill the business requirements, here is the list of Microsoft products that integrate with Salesforce.
- SharePoint
- Microsoft Azure
- Microsoft Teams
- Outlook
- OneDrive
- Intune
